Allowing websites or allowing only certain websites is a critical feature for a Lock down solution. We support this feature for iOS devices as well, but we support it in the format that iOS supports. Please find below the steps to allow any website and some notes related to it.
Video Guide:
Please watch the following video that explains how to use Allow Websites in iOS.
Creating an Allowed Website
- Login to your Scalefusion Dashboard.
- Navigate to Device Profiles & Policies > Allowed Websites section.
- Click on the Allow a Website button.

- You would see a Dialog with 3 tabs, DETAILS | Android Settings | Apple Settings
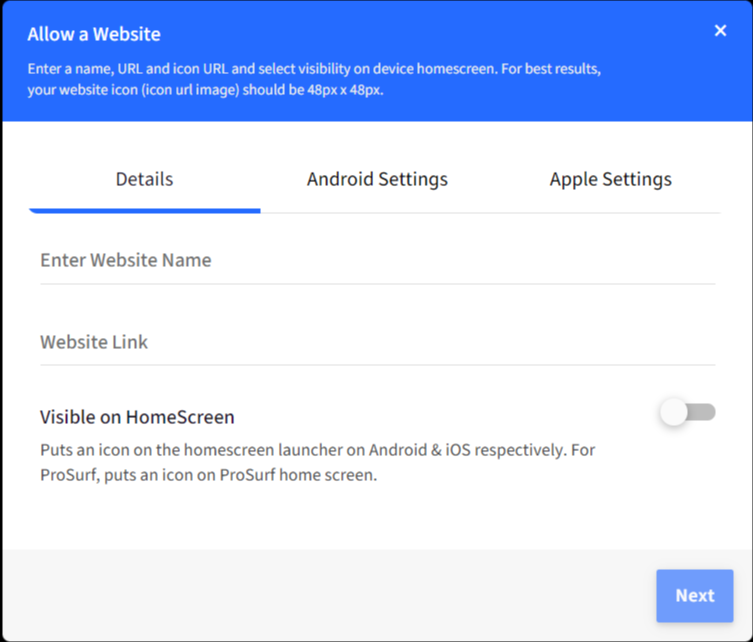
- Under the DETAILStab
- Enter the name for the shortcut
- Enter the URL for the shortcut. To publish two or more unique URLs on a device, custom fields can also be entered here (For eg. $device.<fieldname>).
- Choose if the Shortcut should be visible on Home screen or not.
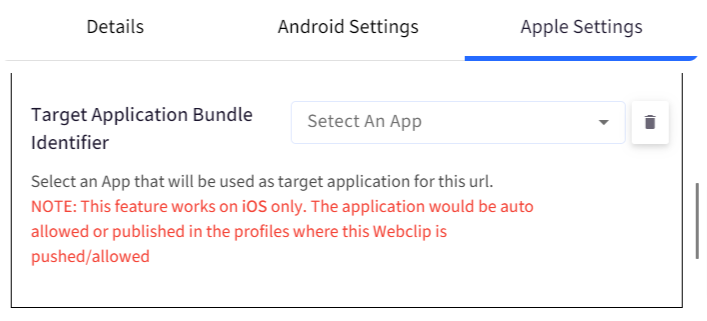
- Navigate to the Apple Settings tab and set the following configurations:
General Settings
| Setting | Description |
| Upload icon | Upload an icon for the web-clip/shortcut. If none is provided then the iOS default icon will be displayed in iOS Springboard |
Safari Settings
Configure settings for Safari browser
| Setting | Description |
| Allow users to remove icon from Home Screen | If enabled, this settings allows users to long-click on the web-clip and remove it from home screen. They can still access it from Safari. |
| Display in Full Screen | Use this setting to open this website in full screen. This works only if the web-clip is visible on home screen. |
| Open Links/External URLs inside WebClip | Use this setting to open any external websites without showing Safari's UI. The URL opens inside the WebClip This setting will get activated only when Display in Full Screen is toggled ON |
| Target Application Bundle Identifier | Through this setting, Web-clips or shortcuts can be used to launch installed applications. From the drop-down, select an app, and This would allow a Web-clip to be pushed, and the app will be used as the target application for the allowed website's URL. If this WebClip is allowed in the profile, the application selected here will be auto-allowed or published If the app is uninstalled or deleted from the dashboard's application management menu, then Webclip will also get unpublished from the device profile. |
ProSurf Settings
Configure settings for ProSurf browser
| Setting | Description |
| Allow Top Level Domain | Enable this setting to allow allow at the top level so that any page which is part of that domain will be allowed, For ex.: If you allow https://scalefusion.com then any page from that domain will be allowed like https://blog.scalefusion.com |
| Allow Zoom Controls | Enabling this setting allows zoom-in/out on websites |
| Auto Play videos | If this setting is on, the embedded video in the URL will be auto-played. |
| Allow JavaScript Pop-Ups | If you want to allow this website to open Javascript popup windows, toggle on this setting |
| Auto-Refresh Website | Here you can specify the time (in seconds) after which the website Auto-Refreshes if there is no user interaction during that time. Minimum value is 30 seconds. |
| Clear Cache/Cookies on Auto-Refresh | Clears cache and cookies every time the page reloads (based on the time specified for auto-refresh) This setting gets enabled only if you have given auto-refresh time interval |
| Always Load Root URL at Launch | Use this setting to always load the root URL of the allowed website even if the website's tab is minimized or automatically refreshed |
| Enable Javascript Interface for this URL | This settings enable the Javascript interface, that is, exposes APIs injected by ProSurf, for the allowed website. With this, you can invoke ASAM mode via Javascript APIs |
Publishing Allowed Websites
The Allowed websites can be published in the following two ways:
1. Publishing from Allowed Website section
- Navigate to Device Profiles & Policies > Allowed Websites.
- Click on the Publish icon Next to the Allowed Website
- Choose the Device Profile(s) where you want to publish it and click on PUBLISH.
- The shortcut will be published to all the devices in the selected profiles.
2. Publishing from Device Profile
- Navigate to Device Profiles & Policies > Device Profiles
- Select the Profile where you want to publish it and click on EDIT icon
- Once in the Edit mode, navigate to Browser shortcuts and select the shortcuts that you want to enable.
- Click NEXT until you reach the Restrictions page.
- Click UPDATE PROFILE
- The shortcut will be published to all the devices in the selected profile.