User Enrollment
- 09 Apr 2024
- 5 Minutes to read
- Print
- PDF
User Enrollment
- Updated on 09 Apr 2024
- 5 Minutes to read
- Print
- PDF
Article Summary
Share feedback
Thanks for sharing your feedback!
Once the users are added to the Scalefusion Dashboard, you can then Invite them to enroll their devices as described in the Inviting the Users section
Below is an explanation of how to invite users to enroll their devices, along with settings that allow users to enroll the devices directly by logging in to their respective Identity Providers.
Prerequisite
- Users should be added/imported to the Scalefusion Dashboard
Inviting the Users
Once you have added the users, the next step is to invite them to enroll in Scalefusion. Follow the steps below to invite them to enroll.
You cannot invite the users until you have filled in the Organization Info and created a BYOD Profile and a QR Code configuration.
- Sign In to Scalefusion Dashboard and navigate to Enrollment Configurations > User Enrollment
- To invite one user click on the Invite/Email action from the action menu in the user listing screen. To invite multiple users, click on the checkbox next to each one of them and then click on the INVITE ALL button at the top of the page.
- You will be shown the Invite Wizard, which is of 3 sections,
- Select Config: First, select the QR Code configuration that you have created earlier.Only QR code configurations with device profiles will be listed here. The QR code configurations that have User Groups attached to them will not be listed.
- Configure Email: Configure the Email template that will be sent out to the users. You can configure only the Welcome (top) and Thank You (bottom) notes of the email. The rest of the email is reserved for use by Scalefusion.
Choose Platforms: Based on the QR Code configurations you have created, the platforms are displayed. Select the platforms to which the email has to be sent.If the settings to enforce users to sign in with GSuite / O365 / Okta / PingOne are enabled, at the time of enrollment, users would be asked to authenticate and Sign In using their respective Identity Provider's credentials to begin the enrollment instead of verifying via OTP.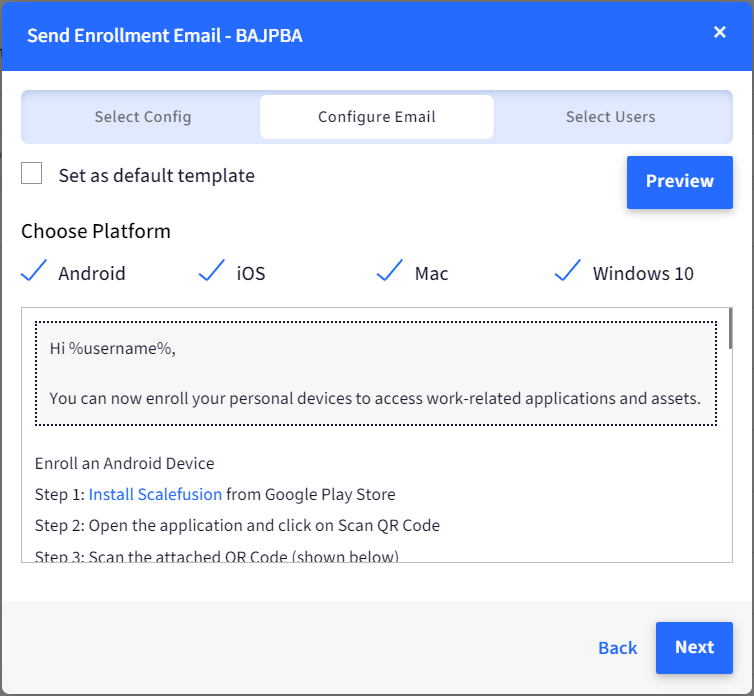
- Review Users: Review the users to which the invite will be sent, and click SEND
- Select Config: First, select the QR Code configuration that you have created earlier.
- The users will get an email from Scalefusion with instructions on how to download and enroll in Scalefusion. Please refer to our Enrolling an Employee Owned Deviceguide to learn how the user experience would be.Note:Users can also be invited from the QR Code Configurations section. Navigate to Enrollment Configurations > QR Code Configurations, select the BYOD configuration and click on the Invite Users button

Viewing Enrolled Devices
Once your users start enrolling their devices, you can see all their devices under the Devices section. However, if you want to precisely see the mapping of users and their devices, then you can use the View action next to each user to get the details..png)
.png)
Deleting a User
- To delete a user completely from your organization, use the Delete action from the action menu. This will not only delete the user but delete all the work apps and the data from their enrolled devices and remove their devices from the Dashboard.
.png)
- If you just want to delete just one device of the user, then you can view the list of enrolled devices of that user and select the delete action. This would remove the work apps and all their data only on the selected device.
.png)
.png)
.png)
Enrollment Settings
By configuring these settings, the users at the time of enrollment on their devices can be authenticated by signing in with their respective Identity Provider's credentials instead of verifying via OTP. The settings are explained below:
These Settings are available only to users who sign in with their GSuite organization ID, O365 account, AD or SAMLSSO credentials.
GSuite / O365 users
- On Scalefusion Dashboard, navigate to Enrollment Configurations > User Enrollment
- Click on the Settings buttonOnly subscribers to Legacy and New Enterprise Plan can access Settings. The rest of them will get an option to upgrade.

- The User Management Settings dialog box opens
Setting Description Enforce users to sign in using GSuite / O365 By default, this toggle is set to OFF. If set to ON, users will be asked to sign in using their GSuite credentials. Select Sync duration for User Group changes With this setting, you can configure the duration (in days) in which changes like user addition, deletion, and group switch made on the Gsuite/O365 portal should be synced automatically with the Scalefusion dashboard.
By default, it is set to 2 days. You can choose from 1 to 5 days.
Send Automatic Invite Emails for Imported users Sends automatic invite emails to any newly imported users to any user group. By default, this is OFF. Automatically Remove Management/Policies on Deleted Users When enabled, this removes all user management policies from user's devices when Scalefusion detects that user(s) have been deleted. In other words, deleting a user from the portal will delete management from the device as well and on the dashboard, the device will show as unmanaged.
If this flag is enabled, during save, it will ask the admin to enter the PIN.
- After configuring, click Save

SAML users
For users signed in with SAML credentials (Okta or PingOne), the following Settings are configurable:
- Enforce users to sign in using SAML SSO credentials to begin enrollment of devices.
- Allow OTP-Based Fallback on Android devices: Allows OTP-based enrollment on devices where there are issues during authentication via IdP/SAML either due to lack of compatible browser or the user forgetting their credentials.


AD (Active Directory) Users
For Active Directory users setup via On-Premise Connector, following settings are configurable once OPC setup is done on Scalefusion Dashboard:
- User Import Settings
- Auto Import users on enrollment: On enabling this, users will be automatically imported to Scalefusion Dashboard when they enroll their devices to Scalefusion. IT Admins can simply send URL and enrollment code and have their users enroll without having to import/invite them.
- Auto Import only if Group is imported:Auto Import only if Group is imported: This setting will be active only if above setting (Auto import users on enrollment) is toggled on. With this, users will be auto imported on Scalefusion Dashboard only when their parent AD group is imported via User Groups. As a result, Admins can import only the groups from which they want to allow enrollment.
However, if only setting a. (above) is enabled, the group to which the user (who has enrolled) belongs, will be auto imported but the devices won't have any profile attached to them.
- User Enrollment Settings
- Enforce users to sign in using AD SSO: If enabled, users will be asked to sign in with their AD credentials to begin enrollment of devices.
- Allow OTP-Based Fallback on Android devices: Allows OTP-based enrollment on devices where there are issues during authentication via AD credentials either due to lack of compatible browser or the user forgetting their credentials.


Enrolling Devices
Once the invitation is sent from Scalefusion Dashboard, the users will get an email from Scalefusion with instructions on how to download and enroll their devices into Scalefusion. Please refer to the following guides to learn how user(s) can enroll their devices:
Was this article helpful?