Role Based Access to Scalefusion Dashboard
- 13 Sep 2023
- 4 Minutes to read
- Print
- PDF
Role Based Access to Scalefusion Dashboard
- Updated on 13 Sep 2023
- 4 Minutes to read
- Print
- PDF
Article Summary
Share feedback
Thanks for sharing your feedback!
Scalefusion lets administrators designate roles for users. Each role carries a different set of permissions which are critical for secure usage of the product. Hence, on the Scalefusion Dashboard, we provide role-based access control to achieve this.
This document describes all such roles and permissions provided under each role, along with how they can be assigned to an administrator.
How to Access
The Roles & Permissions can be accessed from the Admins and Roles section on the Dashboard. To access,
- Click on your account profile in the upper right corner
- Click on Admins and Roles. This opens the Admins and Roles page.
 This page can also be reached by clicking on the Admin and Roles button from the Account profile page (accessed by clicking on View and Edit Profile). See the screenshot below.
- Navigate to the Roles & Permissions section


Role Types/Categories
There are two categories of roles:
- System Roles: Scalefusion has some pre-defined roles that come with a specific set of permissions for users, which they can assign while creating administrator(s).

- Custom Roles: You can also create your own custom role, assign permissions as per the requirements of the defined role and assign it to administrators.


They are described as under:
| Role Name | Description | Category | Sub Category |
| Group Admin | Has access to the devices and other features only for the device groups he/she is assigned | System Role |
|
| Device Admin | Has access to all the devices present in the account | System Role |
|
| Co-Account Manager | Has access to all features similar to the owner | System Role | All Access |
| Custom Role | Create your own custom role, enable/disable permissions as per requirement | Custom Role | Customized |
*Read Only: The features of Dashboard are available in read-only mode to the user.
**Read and Write: The users are allowed to read and also make changes to them.
Permissions
In any role, there are three sets of permissions
- Visibility: The said feature is visible or hidden
- All Access: The user has all access to the feature, that is, read as well as make updates. Roles with Read and Write permissions will have All Access to features (if visible).
- Read Only: The feature is visible in read-only mode; that is, no changes can be made by the user. Roles with Read Permissions will have a restricted view of features that are read-only (the ones that are visible)In system roles, these permissions are pre-defined and hence cannot be modified by the administrator. While creating an admin, simply choose the role, and all permissions under that role will be assigned to the admin.


Accessibility of features for pre-defined roles
To take a look at the features enabled/disabled under a pre-defined role, click on View below each system role. The icons described below will help in identifying the feature accessibility for a particular role.
- Visibility: The feature and sub-feature that would be visible for a role is marked with a green eye icon, and the one that is not is marked with a red eye icon.
- All Access: Marked with green tick mark if allowed, and red hyphen if not allowed
- Read-Only: Marked with green tickmark if allowedIn general, any feature that is not visible will not have all access and read-only permission.
For example, Device Admin (Read and Write) will have access to the following:
Here, the Devices section is visible with all access to users, whereas Android For Work Setup, Apple Setup, and Windows Setup won't be visible to users.
Accessing System Roles
Device Admin
To access, click on View under Admins and Roles > Roles & Permissions > Device Admin card.
You will be able to view the features with their permission corresponding to each.
Exceptions
Device Admins with Read and Write role will have access to Remote Mirror and Timezone Settings, whereas for Device Admins with Read Only role, these will not be visible.
Group Admin
To access, click on View under Admins and Roles > Roles & Permissions > Group Admin card.
You will be able to view the features with their permission corresponding to each.
Exceptions
- Group Admins with Read and Write roles will have access to Remote Mirror and Timezone Settings, whereas, for those with Read Only roles, these will not be visible.
- Groups - Group Admins get read-only access to the Device Groups and User Groups that they administer.
- Enrollment Configurations - Group Admins have visibility to Manage Organization Users (User Enrollment) in read-only mode for the groups that they administer. However, Bulk Enrollment and QR code configurations won't be accessible to them.
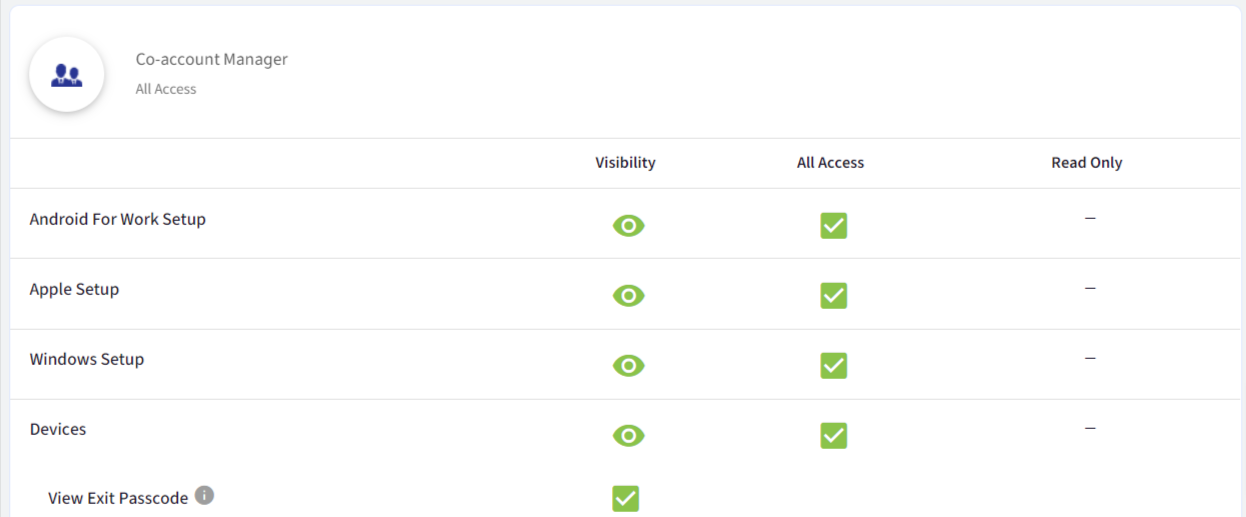
Co-Account Manager
To access, click on View under Admins and Roles > Roles & Permissions > Co-Account Manager card.
You will be able to view the features with their permission corresponding to each.
A co-account manager will have visibility and access to all features.
Custom Role
To create a custom role:
- Under the Admin and Roles page, click on the Roles & Permissions tab.
- Click on Create New under Custom Roles.
.png)
- A new page will open. Fill in the following details:
- Role Name: Enter a name for this role
- Creating Role: Choose one, whether you want to create a role for All Devices or for Device Groups

- Permissions: There are three categories to set permissions:
- Visibility: Toggle this button to on/off based on whether a particular feature should be visible on the dashboard.
- All Access: This provides both read and write permissions to the admin.
- Read Only: This provides read-only permission to the admin.Any feature can either be assigned with All Access or Read Only
- Once all the permissions are set, click on the Save Role button.
.png)
- The custom role created will appear on the Roles & Permissions page.
.png)
.png)

.png)
.png)
Customizing a pre-defined role
If you want to customize any pre-defined role,
- Click on View under the system role (which has to be customized)
- Click on the button Make a copy

- This opens a page where you can provide a new role name and make changes in permissions to create one based on your requirements.


Assigning a role to admin
If you want to assign a role to an admin:
- Visit the Administrators page and click on the three dots in front of an existing admin. Select Edit.
- This will open the Edit Admin User window. Here, in the Role drop-down, select a role and SubmitAll system and custom roles are listed in the Role drop-down
.png)
- The selected role, with all the permissions defined in it, will be assigned to this admin.
.png)
Was this article helpful?