Publishing Content on Devices
- 11 Mar 2024
- 13 Minutes to read
- Print
- PDF
Publishing Content on Devices
- Updated on 11 Mar 2024
- 13 Minutes to read
- Print
- PDF
Article Summary
Share feedback
Thanks for sharing your feedback!
Scalefusion's Content Management is one of the frequently used add-ons. This service helps you distribute your enterprise content in a safe and secure manner to your Scalefusion-managed devices. It also provides features to place content at custom locations on your devices.
For smooth Content Distribution, Scalefusion provides a custom application named as FileDock. FileDock gives you the ability to distribute files and folders to your managed devices quickly and efficiently.
This document guides on how to upload your enterprise content on Scalefusion Dashboard and then push it onto your managed devices, all this using FileDock and Content Management.
Before you Begin
- On the Scalefusion Managed devices, you would need the following
- The latest version of FileDock on Android and Windows devices
- iOS: the latest version of Scalefusion iOS Agent.
- macOS: Latest version of Scalefusion - MDM client application
- Make sure you have an active subscription to Scalefusion Content Management.
- Make sure you have access to the Google Drive account and the files that you want to publish.To learn about installing FileDock on devices, please click hereContent Management is a paid add-on service post the free trial period.
Upload Content on Dashboard
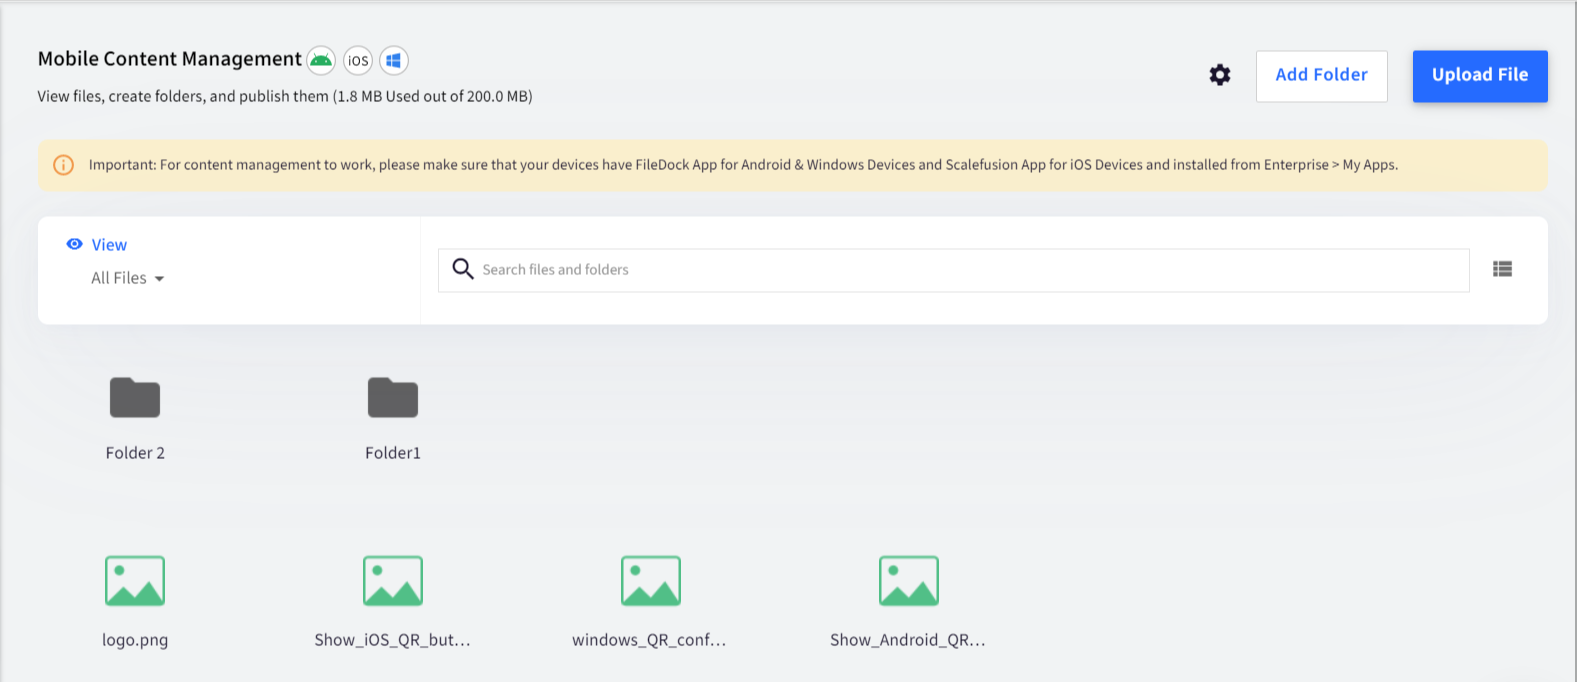
- On the Dashboard, go to Content Management > Content
- To add a file, click on UPLOAD FILE

- This opens the File Upload dialog box, which has two separate tabs
- Upload from Computer
- Upload Using External Link

Upload from Computer
Through this, you can upload any file lying on your system. To do so, either drag and drop files here or click on UPLOAD FILE and select the file you want to upload from your machine.
The total upload limit is based on the plan you have purchased
The total upload limit is based on the plan you have purchased
Upload Using External Link
Scalefusion's Content Management service comes with 50MB, 100MB or 200MB bundles, but sometimes the space might not be enough to push your enterprise content, as you might be having a large training video or you might want to use Content Management in Presentation mode where there are multiple large marketing videos.
To address these use cases, we have allowed you to use your Google Drive files to be distributed via Scalefusion Content Management. The steps below guide you on how to upload/link your Google Drive files to Scalefusion Content Management.
Making the File accessible on Google Drive
- Sign In to your Google Drive account.
- Navigate to the folder and right-click on the file that you want to publish via the Content Management service.
- From the list of options, select Share
- On the dialog as shown below, click Advanced

- Under the Who has Access option, click Change

- From the dialog shown below,
- Select On - Anyone with the link
- You can leave the access permission at it’s default that Can View.
- Click Save
- Now copy the URL link of the file that is shown in the Link to Share box.
.png)


.png)
Linking the File on Content Management
- Sign In to your Scalefusion Dashboard
- Navigate to Content Management > Content
- Click on UPLOAD FILE
- In the Upload dialog,
- Click on Upload Using External Link
- Paste the URL that you copied from Google Drive, as shown below
- At this point, Scalefusion's Content Management tries to fetch the details of the file. If it succeeds, then the file information is shown as shown below. Note that we cannot fetch the size of the file, and hence it is shown as 0 bytes. If the file format is not supported OR if there is an error, then an error is displayed.
- Click on SAVE EXTERNAL URL
- Once saved, this file will now appear on your Dashboard.
From this point, you can publish/unpublish this file to your devices and groups as you do with a locally uploaded file.
Files uploaded using this option are not uploaded to our servers. In short, they do not consume your Content Management space.
You can filter the list of files on Dashboard to quickly see the ones that were uploaded locally or linked from Google Drive.
Points to Remember
- If the Google Drive file is deleted after it is uploaded on Content Management, then on devices, the downloads will fail.
- If the Google Drive file does not have the required access permissions as described in the steps above, then neither the dashboard nor the device can retrieve the file details.
- Only the following file formats are supported for upload, pdf, doc, docx, ppt, pptx, xlsx, xls, mp4, avi, mkv, 3gp, mp3, wav, 3ga, m4a, aac, ogg, amr, gif, txt, zip, db, json, exe, msi, pen, pff, cslog, csdb, pen, ss, js, html, jpg, png, KMB, kml, kmz, mwm, tpk, CSS
- Although Scalefusion's Content Management supports the upload of formats mentioned above, the FileDock application can natively open certain file formats. You would need 3rd party viewers on the device to open unsupported file formats.
Support for Folders and Sub-folders
Scalefusion provides the capability to add Folders / Sub Folders on the dashboard and push the entire folder/subfolder on managed devices via FileDock. To add a folder,
- Navigate to Content Management > Content
- Click on ADD FOLDER

- Enter a folder name in the Create Folder dialog box and click Save.


The folder will be created.
To upload content (file) inside the folder, click on the Upload File button placed inside the Folder. Follow the same steps explained in the above section to upload content.
Sub Folder
- Sub-Folders can be created inside the main folder.
- Sub folder feature is only supported for Android devices.
- Subfolders can be created up to 3 levels.
- To create a Sub Folder, click on the ADD FOLDER button placed inside the main folder, enter a name and click Save.
Other Actions
Other actions can be performed on a folder from the Scalefusion Dashboard. These actions can be accessed by clicking on the three dots in the right side panel that opens on clicking a folder:
- Create Folder Shortcut: For the selected folder, the shortcut will be added on devices on which it is published. The shortcut will be visible on device home screen for quick and easy access. If a shortcut is already created, the action changes to Remove Shortcut, which removes the shortcut from devices. This feature applies to Android devices only.
- Rename: The folders can be renamed with this feature. Clicking on Rename brings up a dialog box where you can enter a new folder name and Save.
- Delete: Deletes the folder
Publishing Content on Device
- Once the file gets uploaded, it will be available on the dashboard.
- Click on the file. This opens a panel on the right side showing brief information related to the file (name, file type, size, date added etc.). Here, click on the Publish button.
- Show this file at Root Level: Enabling this setting will show the selected content at the root/top level on the device else selected content will be shown inside its parent folder on the device. Click Okon on the dialog box that opens on enabling this setting if you want the selected file at the root level on the device.
Published On: Gives the count of devices on which the File is published
Downloaded On: Shows the count of devices on which the file is downloaded. This number is updated on the Dashboard after syncing analytics on the device.

- Show this file at Root Level: Enabling this setting will show the selected content at the root/top level on the device else selected content will be shown inside its parent folder on the device. Click Okon on the dialog box that opens on enabling this setting if you want the selected file at the root level on the device.
- This opens the dialog box where you need to select the Device Groups/User Groups/Device(s) on which you want to publish the file. After selecting, click Publish

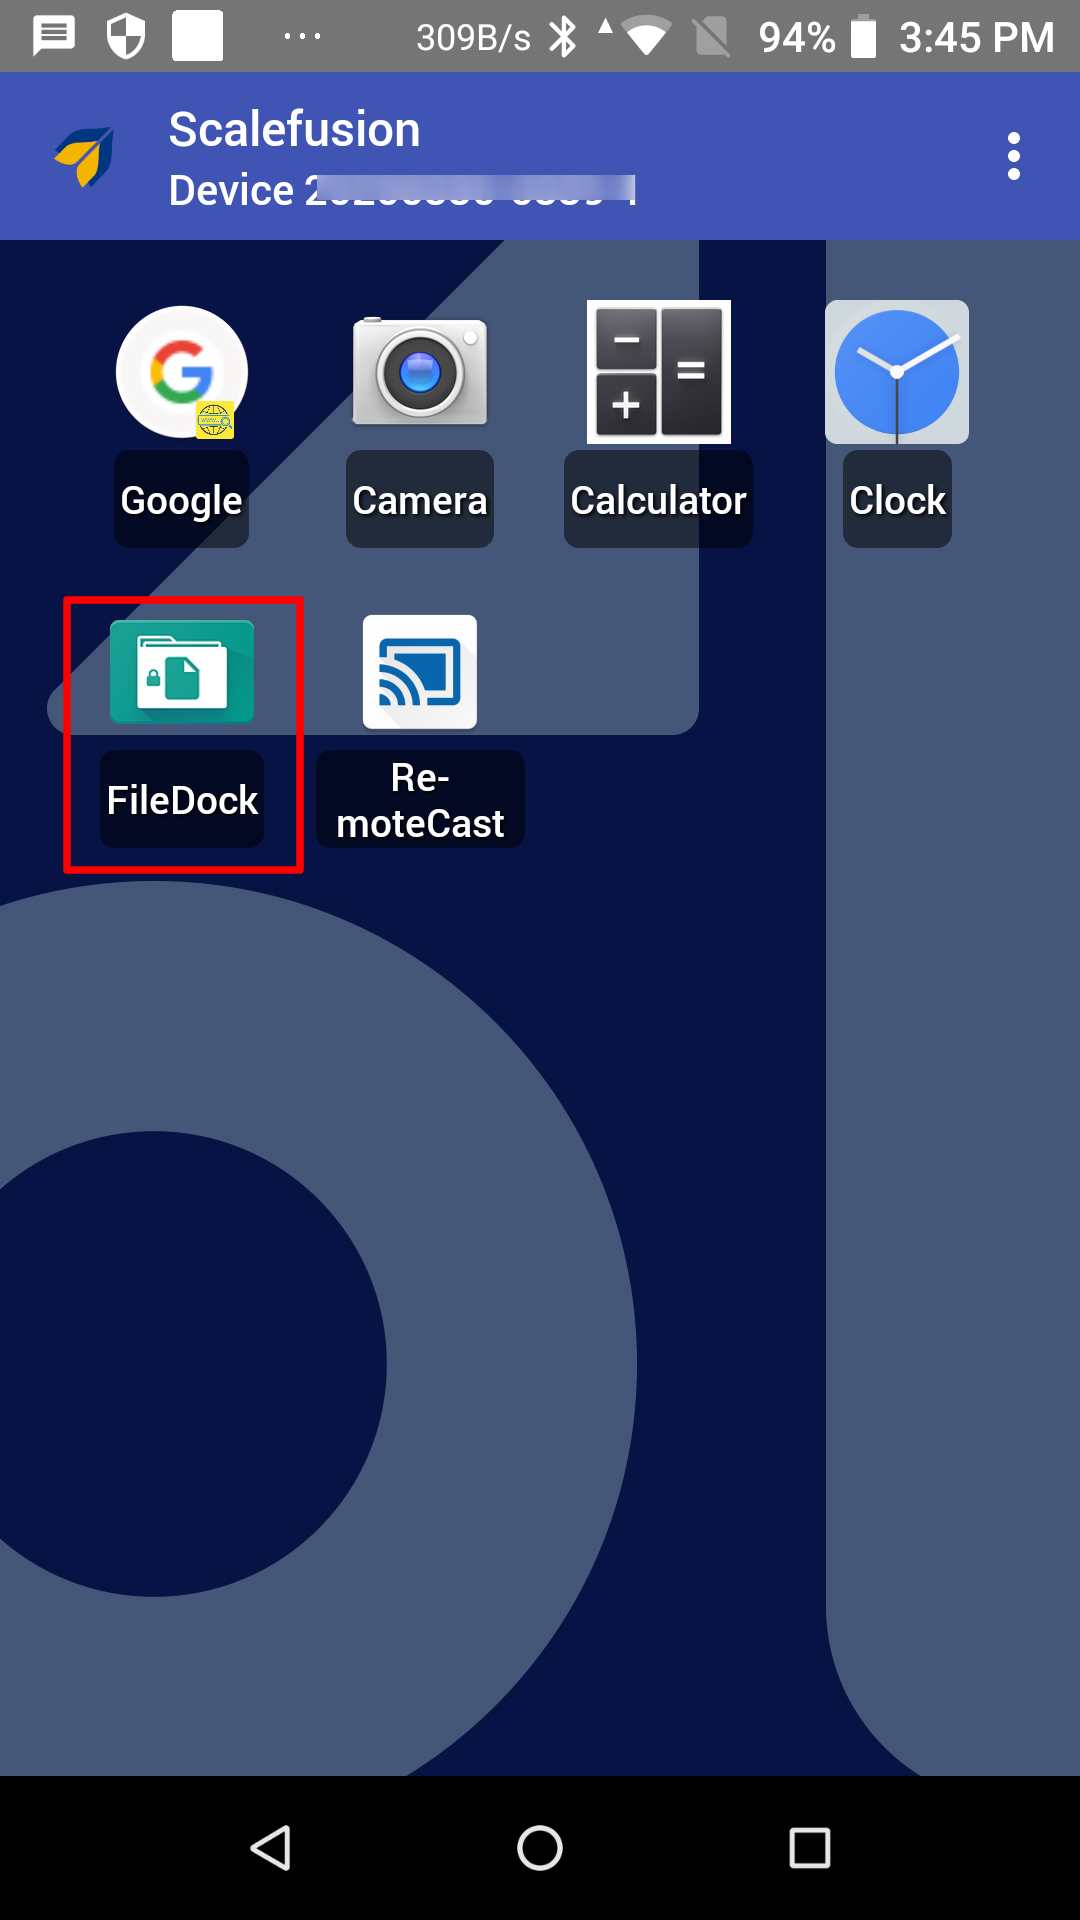
- On the device, tap on FileDock App. (Below is a screenshot of an Android device)
- On Windows Devices, a folder with the name Scalefusion gets created in the FileDock app. Click on it, and the file you just published will be available there.
In Android devices, a folder with the name Mobilock gets created in the FileDock app, and the file you published is available inside this folder.The Mobilock folder is the default location where the published files/folders are stored. Scalefusion also provides the capability to configure custom locations to store the content. This is explained in the next section.


On Mac Devices, the files are available inside the Scalefusion MDM client application under the FileDock tab
The content is published on the device.
Publishing Folders and Sub Folders
- When a folder is published, it becomes visible when you tap on FileDock > MobiLock on the device, and the content inside the folder also becomes available.In the case of Windows, it will be in the Scalefusion folder.

- For Subfolders, at the time of publishing, there is an additional setting Show this Folder at Root Level. Enabling this setting will show the folder at the root/top level on the device, else will show the folder inside its parent folder on the device.


Important points on publishing folders and sub-folders
- If a folder is published, then all the Sub-Folders and Files inside of it will also be published. A folder can be published on all platforms.
- If a sub-folder is published, then files inside the sub-folder will be published only on Android devices. At the time of publishing, devices of all platforms will be visible in the Publish dialog box, but they will only be published on Android devices.
- If any file that is inside a subfolder is published individually, then it only gets published on Android devices, not on any other platforms. In this case, only Android devices will be visible at the time of publishing.
- On other platforms, you can only publish the entire folder, not any individual file inside it.
Android FileDock Settings
Sometimes you may want the Files to be downloaded to a custom location instead of Scalefusion’s default folder. We allow IT Admins to configure additional settings using the Settings option in the Content Management screen. Clicking on the Settings button initiates the flow,
- On the Scalefusion Dashboard, navigate to Content Management > Content
- Click on the SETTINGS icon


This opens the Android FileDock settings dialog box.
Primary Folder Location
- In the Android FileDock settings dialog box, under Primary Folder Location, you can configure the default folder location
- Use Default Location: The content (files and folders) gets published on the device in Scalefusion's default folder, that is, Mobilock. This is selected by default.
- Use Custom Location: Define the location where the files and folders should be stored on your device once published. It should be defined by putting a forward slash followed by the folder name. For eg. /ABC/DEF
a. When you define a custom location, the existing content, which was in the default folder, also moves to the new location.
b. You can also use custom properties like $device.properties in defining custom location
2. After specifying the location, click SAVE.
The primary location gets configured.
Expiry Period for Published Files
You can configure an expiry period for the published files after which they will be deleted from the device locally, based on the download date. Such files become inaccessible on expiry although they are visible on the device (marked with an expired icon). Click on the drop-down in front of Set Expiry time and select one of the options:
- Don't Auto Expire: The files published will not auto expire
- After Configured Days: Enter the no. of days after which the file should expire. You can set anywhere from 1 to 180 days.


Important Points to Note:
- The expiry period is at a file and not a folder level.
- This feature is for both Company Owned, COPE and BYO devices
- The expiry period is not applicable to files at additional locations.
- Files deleted locally will not be downloaded again, until they are unpublished and republished to the device.
- If the device is in a group, then you would have to remove it from group and add it again for the download to happen.
- You can also choose to show/hide or view the expired files by clicking 3-dots menu.
This is how the expired files will appear on the device
FileDock Usage Scope
You can control which files/folders should FileDock display on the device by configuring the scope of FileDock. Choose one of the following options to define FileDock usage scope:
- Show only the files/Folders Published from Dashboard: The files/folders published from the Dashboard will be displayed on the device, inside FileDock

- Show Published & Files/Folders from selected Additional Locations: If you have defined additional location for the files to be published, selecting this option will show up those files from the Additional locations you have selected. The flag Show published Files/Folders should be checked in front of the defined Additional Location, to be shown inside FileDock.

- Show All Files/Folders on Device: All Files/Folders including system files/folders are visible inside FileDock.


Define Additional Locations
IT Admins can also pre-define the additional targets (specific location) that can be used during Publishing files.
- In the Android FileDock settings dialog box, under Additional Locations, click on the ADD button

- In the input area, enter the location's path by putting a forward slash followed by the folder name. For eg. /AddLocationYou can also use custom properties like $device.properties in defining additional targets
- Click SAVE


The additional location gets configured.
Once an additional location is saved, the next time you open the FileDock settings dialog, the locations are non-editable. The saved locations can only be deleted.
Publishing Content after defining Locations
The steps to publish content are the same as described above (Publishing Content on Device). The difference is, that when you define Primary and Additional locations, the publish dialog box has the option to publish the content on the primary location, or additional location or both.
Publish to Primary Location
If you select to publish content to Primary Location, you will notice on the device, that the files and folders are placed at the location defined in Custom Location.
If you have defined a path in custom location as /ABC/DEF, then
- In the FileDock app on the device, the files get stored in the root folder, that is, DEF [The last path segment is treated as folder name].

- In the File Manager of your device, the files will reflect inside the ABC > DEF folder.


Publish to Additional Locations
At the time of publishing, select the file's location (as defined in additional targets). For eg. if you have defined an additional target as /AddLocation, it should be selected in the Publish dialog box.
Folders can also be published on the Additional locations

On the device, the folder AddLocation will be created in File Manager and the selected file/folder will reflect there.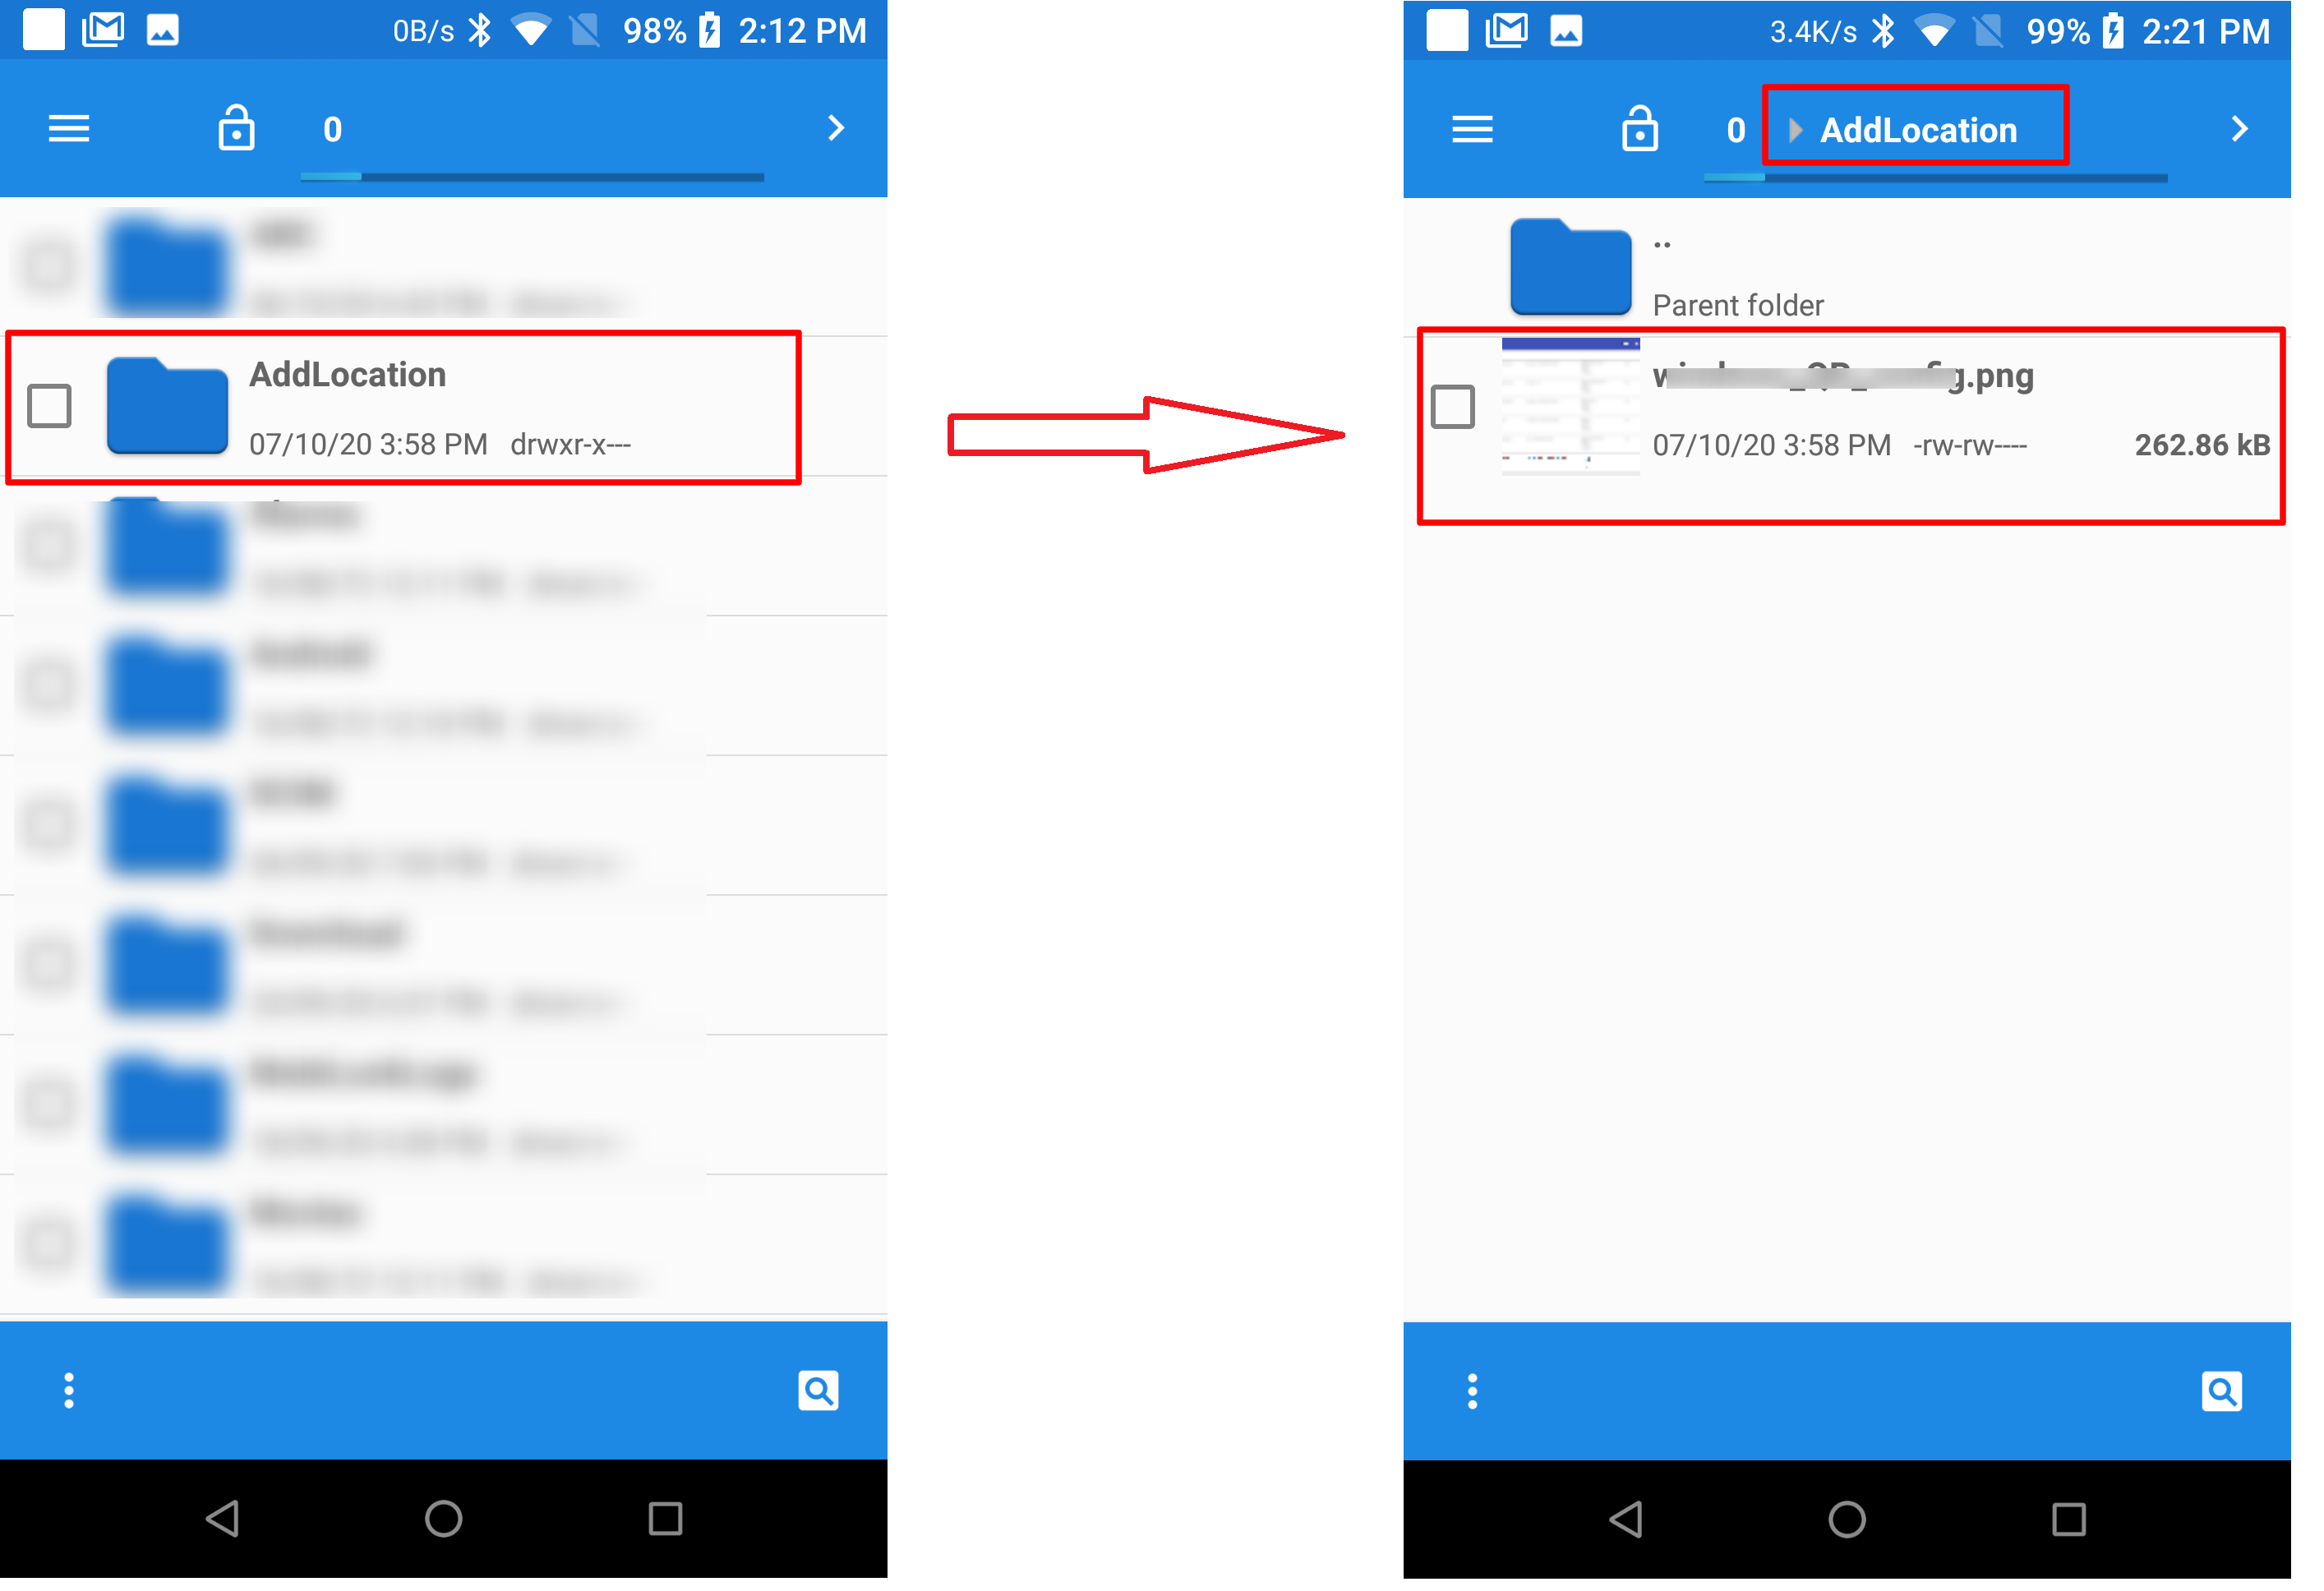
Unpublish Content
A file or folder, once published, can be unpublished from the device. To do so:
- On the Scalefusion Dashboard, navigate to Content Management -> Content
- Click on the file. This opens a panel on the right side showing brief information related to the file (name, file type, size, date added etc.). Here, click on the Unpublish button.

- This opens a dialog box that lists the Device Groups/User Groups/Devices on which the file/folder is published. Select the Device Groups / User Groups / Devices from which you need to unpublish the concerned file or folder and click Unpublish If any file/folder is not published yet, the Unpublish dialog box will show as empty.
 On Android devices, the file/folder will be removed from inside FileDock's Mobilock folder


If files/folders have been pushed to primary or additional locations, the Unpublish dialog box shows all the locations where the file is published, and you can select the ones from where the content has to be unpublished.
When you unpublish any file from the additional location, the file won't be removed from the local storage of the device, that is, File Manager
Files or Folders published to additional locations will not be deleted from the device when unpublished from the Dashboard.

Other actions
Other actions can be performed on a file from the Scalefusion Dashboard. These actions can be accessed by clicking on the three dots in the right side panel that opens on clicking a file:
- Create File Shortcut: For the selected file, the shortcut will be added on devices where it is published. If a shortcut is already created, the action changes to Remove File Shortcut, which removes the shortcut from devices.This feature applies to Android devices only.
- Rename File: The files can be renamed with this feature. Clicking on Rename File brings up a dialog box where you can enter a new file name and Save.
- Move to Folder: Move the selected file to another folder
- Copy to Folder: Copy the selected file to another folder
- Download: Downloads the file on the system
- Delete: Deletes the file


Presentations
Scalefusion's Presentation mode is an Android, Windows and iOS device-specific feature on top of the Scalefusion Content Management add-on that lets you easily turn your Scalefusion managed devices into Digital Signage Kiosks or use your content as screensavers.
To learn more about creating a presentation and publishing it on your devices, please click here.
Was this article helpful?