Mac (macOS) Devices Inventory & Actions
- 29 Sep 2023
- 5 Minutes to read
- Print
- PDF
Mac (macOS) Devices Inventory & Actions
- Updated on 29 Sep 2023
- 5 Minutes to read
- Print
- PDF
Article Summary
Share feedback
Thanks for sharing your feedback!
Scalefusion's Devices section gives you a complete view of your device inventory across operating system including macOS. As and when a new device successfully enrolls in Scalefusion, the device will start appearing in Scalefusion Dashboard.This guide focusses on familiarizing you with the Scalefusion Device inventory view and the various features available with regards to macOS devices.
Before you Begin
- Make sure you have enrolled at-least one device using our enrollment guide.
- Logged into Scalefusion Dashboard.
Scalefusion Devices View
- Once you login to Dashboard, navigate to the Devices view. In this page you would see all the devices that have enrolled till now.You can switch between List view or Grid view using icon
at the top of the page
- By default, Scalefusion displays some critical information about the enrolled macOS device in the devices view,

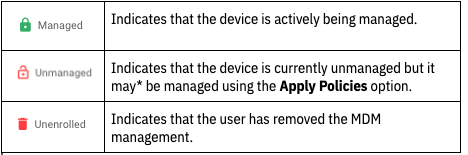
- Device Status: Indicates the current management status of the device. The possible states are,
- Device Name: Indicates the device name. By default it is the auto-generated name as per the enrollment configuration.
- Device Group: Indicates the Device Group that the device is currently assigned to.
- Last Seen: Shows the last time Scalefusion backend was able to ping the device. Currently Scalefusion backend makes an automatic ping every 30 minutes.
- OS Version: Shows the macOS version that was retrieved from the device.
- Device Status: Indicates the current management status of the device. The possible states are,
- Clicking on the Device name of a particular device takes you to the Device Details Page. This page has been divided into 3 sections,
- Device Information Card: Gives a quick snapshot of the device information.
.png)
- Model Identifier: Shows the model identifier of the Mac device being managed.
- OS Version: Shows the OS version of the Mac device being managed.
- Build Version: Shows the OS Build version of the Mac device being managed.
- Bluetooth & WiFi Mac Address: Shows the Mac addresses received from the device being managed.
- Managed User: Shows the current user that is being managed. To understand more about User management, please refer to this document.
- Host Name: Displays the host name of the device being managed.
- Mac Pin: The PIN number that is required to Unlock the device if the device was Locked in the event of theft.
- Device State View: This displays the current application policy applied on the device in a device frame and provides you information about the Device Profile and the Device Group that this device belongs to.

- Location View: Give a quick view of the last reported IP based location. Also you can quickly see the complete location history of the device or to turn ON/OFF the location collection for this device.This is the IP Based Location and hence may not be accurate.
- Device Information Card: Gives a quick snapshot of the device information.
- Clicking on the Settings/Gear icon as shown below, lets you access additional device-related information and perform device-level actions.

- Change Device Name: This allows you to change the device name that is used to identify the device in the Scalefusion Dashboard.
- Set this as Device Name on Mac/iOS Device: Having this flag checked, admins also have the option to change the device name on the device itself in addition to changing it from Dashboard. The flag is visible in Change Device name dialog box.

- Set this as Device Name on Mac/iOS Device: Having this flag checked, admins also have the option to change the device name on the device itself in addition to changing it from Dashboard. The flag is visible in Change Device name dialog box.
- Full Device Information: Displays additional granular device information retrieved from the device
- Relax Policies: This lets you temporarily relax the device level restrictions. The device is still managed but the policies are not applied.
- Apply Policies: If the policies have been previously relaxed, this option can be used to apply the policies back.
- Refresh Device: Force attempt a Sync with the device and push latest policies. Note that this option works only if the device is connected to internet.
- Add Notes: Allows you add custom notes/additional information to this device.
- Add/Remove To Device Group: Add or Remove the device from a Device Group.
- Assign User: Assign a user to macOS devices using this option. This enables IT Admins to pre-enroll and distribute devices to users/employees, and assign a user for internal tracking. It also makes it easier to identify the device ownership in cases where a large number of devices are distributed among employees. A few pre-requisites to assign a user:
- User(s) should be added/imported in User Enrollment section.
- The macOS device should be enrolled in user agnostic method (Userless Enrollment).
- The user should belong to a user group with a iOS Device Profile applied to the User Group.
To assign a user, - If all pre-requisites are fulfilled, clicking on Assign User will bring up Assign User to device dialog box listing all the users of the user group which the device is part of.
- Select a user and click on Save

- Note that in Device Details, the Enrollment Email will reflect the user's email id whom you have assigned the device.
- The Add to Group option will not be shown under gear icon once device is assigned to a user.
- Set Custom Properties: Set the values for the custom properties that you may have defined. Refer to our custom properties guide to understand how to use them.
- Reboot Device: Sends a reboot command to the device and the device is rebooted if it is online.
- Turn Off Device: Sends a shutdown command to the device and the device is shutdown if it is online.
- Lock Device: Use this option in the event of device theft or lost device. This sends a command to lock down the device with a PIN number. The PIN number is displayed in the Device Information card shown above and is configurable. Please refer to this Help document on how to configure Mac PIN.
- Factory Reset: Use this option to initiate the factory reset on the device. This action will put the device in System Lock state and ask the end user to enter a PIN. The PIN is displayed to you when you factory reset the device and emailed to you as well. Entering the PIN will complete the factory reset. Please refer to our Help document on this process.
- Delete Device: Use this option to un-enroll/un-manage the device and delete it from Scalefusion Dashboard. Note that this action is irreversible.
- Change Device Name: This allows you to change the device name that is used to identify the device in the Scalefusion Dashboard.


.png)


NOTE: Deleting a device when it is Locked, then the end user will be asked to enter the Mac PIN. This PIN is emailed to the admin account that has deleted the device and also displayed in the Account Activity report.
Frequently Asked Questions
Question: Is it possible to reboot multiple devices at once?
Answer: Yes. Please use Device Groups to group the devices. You can send a reboot command to all the devices in a group.
Was this article helpful?