Integrate Windows Hello for Business with Scalefusion
- 06 Oct 2023
- 5 Minutes to read
- Print
- PDF
Integrate Windows Hello for Business with Scalefusion
- Updated on 06 Oct 2023
- 5 Minutes to read
- Print
- PDF
Article Summary
Share feedback
Thanks for sharing your feedback!
Windows Hello for Business replaces passwords with strong two-factor authentication as strong passwords can be difficult to remember and can also be exposed easily to identity theft.
Scalefusion lets IT Admins configure Windows Hello settings and apply these settings to the Windows 10 managed devices. As it uses Azure AD joined devices which are supported by Scalefusion, hence you can enforce additional level of security by configuring Windows Hello.
The document below explains how Windows Hello settings can be configured and applied onto end user's devices.
How it Works
On devices with Azure AD account setup, it lets you use a user gesture to sign in, instead of a password. A user gesture might be a PIN, biometric authentication such as Windows Hello, or an external device such as a fingerprint reader.
Prerequisites
- The devices should have Windows 10 Pro v1809+
- Sign in to Scalefusion using Office 365/Azure AD
- Complete Azure AD setup and enroll the devices using Azure AD.
Configuring Windows Hello for Business
Step 1: Configuration in Windows Profile on Scalefusion Dashboard
- Sign In to Scalefusion Dashboard with your O365 account
- Navigate to Device Management > Device Profiles. Click on a Windows Device profile and edit or create a new Windows Device profile.
- Once in the Device Profile wizard, click on the Settings > Windows Hello section to configure Windows Hello settings.
- In Configure Windows Hello for Business, following options are available:
- Enabled: The additional settings for Windows Hello are visible and can be configured for devices after selecting Enabled.
- Disabled: The Windows Hello settings can be configured but do not get applied to devices when you select Disabled.
- Not Configured: If Not Configured is selected, Scalefusion does not control Windows Hello for Business settings on its managed devices. Rest of the settings are grayed out on selecting Not Configured. By default it is set to Not Configured.
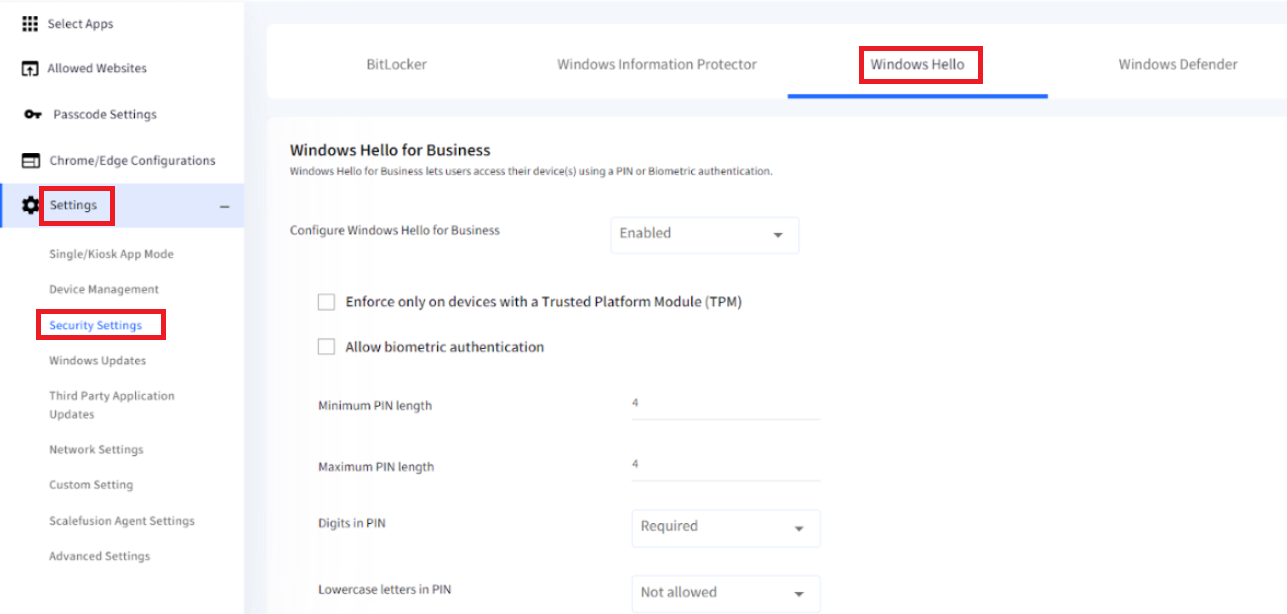
- To configure and apply Windows Hello settings on devices, select Enabled
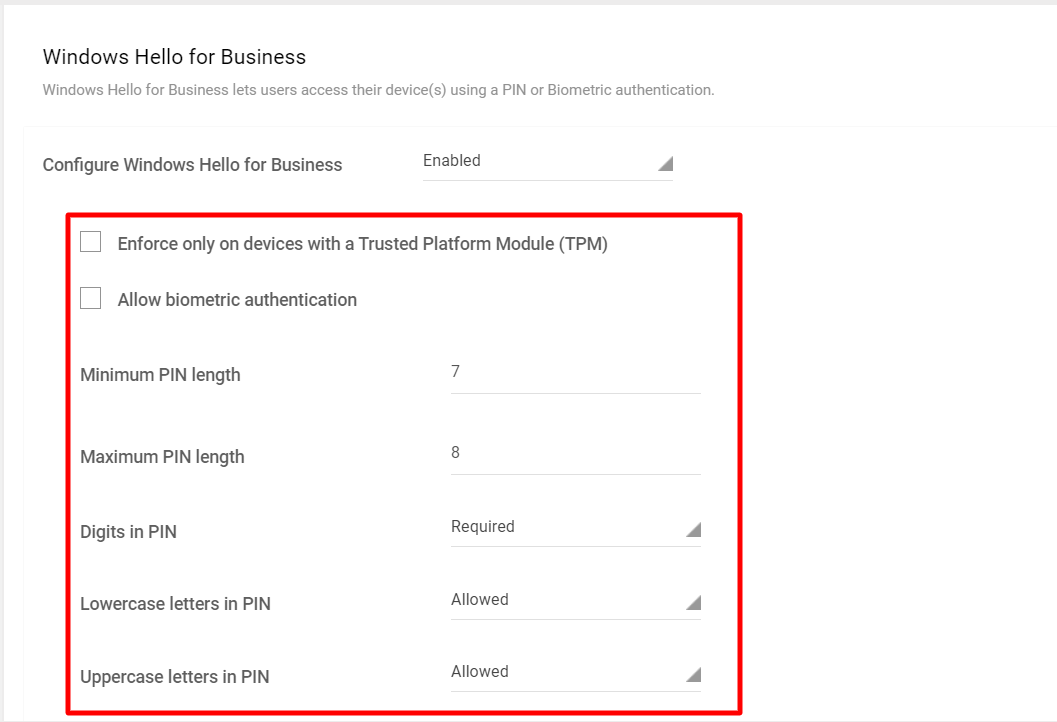
- Settings
- Enforce only on devices with a Trusted Platform Module (TPM): The TPM is a hardware component installed in many newer computers by the computer manufacturers. A TPM chip provides an additional layer of data security. If this setting is enabled, Windows Hello will apply only on the devices having TPM chip installed.
- Allow biometric authentication: Enables biometric authentication, such as facial recognition or fingerprint, as an alternative to a PIN for Windows Hello for Business. Biometric authentication is allowed only when this setting is enabled.
- PIN Settings: Configure PIN settings (maximum/minimum length etc.) that you specify to help ensure secure sign-in.
Setting Description Minimum PIN Length By default minimum length of 4 characters is specified. This can be increased. Maximum PIN Length By default maximum length of 4 characters is specified. The maximum PIN length that can be set is 20 characters. Digits in PIN Choose whether digits should be allowed in PIN. Following are the options to choose from:
- Required - Users must include atleast one digit in the PIN. This option is selected by default.
- Allowed - Users can use the digits in their PIN, but it is not mandatory.
- Not Allowed - Users cannot use digits in their PIN.
Lowercase letters in PIN Choose whether lowercase letters should be allowed in PIN. Following are the options to choose from:
- Required - Users must include atleast one lowercase letter in the PIN. This option is selected by default.
- Allowed - Users can use lowercase letters in their PIN, but it is not mandatory.
- Not Allowed - Users cannot use lowercase letters in their PIN.
Uppercase letters in PIN Choose whether uppercase letters should be allowed in PIN. Following are the options to choose from:
- Required - Users must include atleast one uppercase letter in the PIN.
- Allowed - Users can use uppercase letters in their PIN, but it is not mandatory.
- Not Allowed - Users cannot use uppercase letters in their PIN. This option is selected by default.
Special characters in PIN Choose whether special characters should be allowed in PIN. Following are the options to choose from:
- Required - Users must include atleast one special character in the PIN.
- Allowed - Users can use special characters in their PIN, but it is not mandatory.
- Not Allowed - Users cannot use special characters in their PIN. This option is selected by default.
PIN expiration Specify the duration after which the PIN will expire. The PIN will not be applicable after that duration and there will be a prompt to change it. Following are the options for durations to choose from:
- Never Expires - Selected by default
- 1 Day
- In a Week
- In a Month
- 2 months
- Every Quarter
- Half Yearly
- Yearly
Remember PIN history Restricts the reuse of previously used PINs. Following are the numbers you can select from:
- None - Selected by default
- Current PIN
- Last 5 PIN
- Last 10 PIN
- Last 20 PIN
- After configuring Settings, click on UPDATE PROFILE. Windows Hello for Business will get applied on the devices with this device profile.


Step 2: User Experience on Device
Now that Windows Hello settings have been configured, the user would be enforced to setup Windows Hello at the time of his next login.
Here we are showing an example of a PIN configuration in Windows Hello on Dashboard and the behavior on end user's device.
- Once Windows Hello settings are configured in device profile and applied, at the time of login the user will get the blue screen with instructions to use Windows Hello.
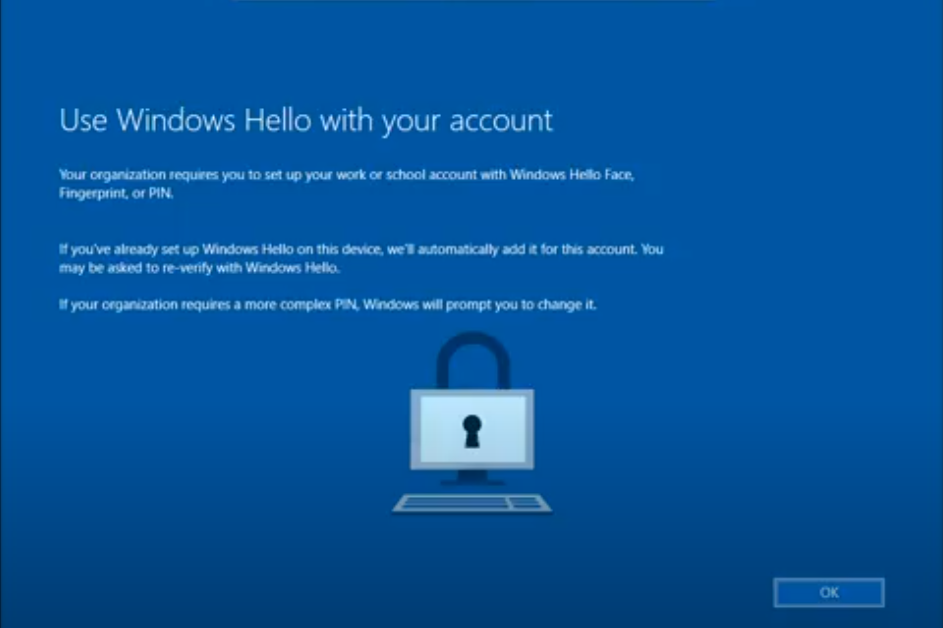
- Clicking on OK will first bring up Microsoft authentication page.
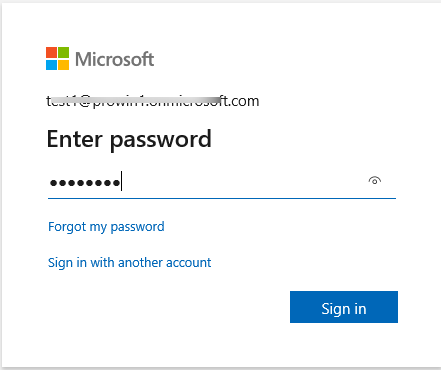
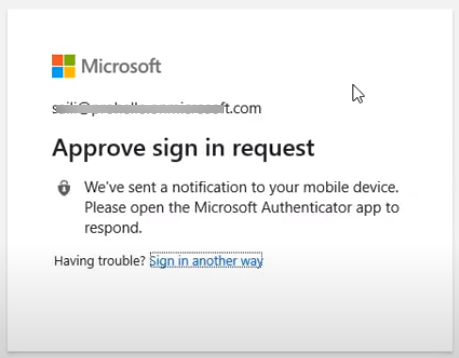
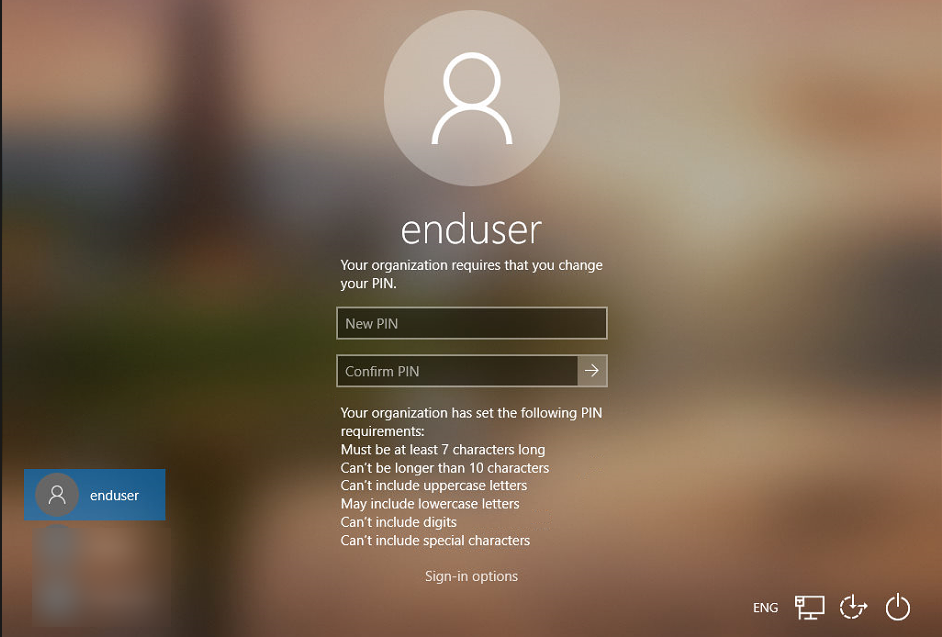
- Next, will bring up the page to create PIN. It also shows all the PIN requirements which admin has set under Windows Hello in Windows Device Profile (Step 1 above). The user should set PIN which meets these requirements.
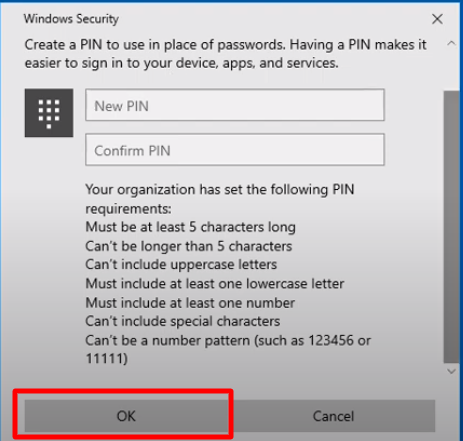
- After setting PIN and clicking OK, the user gets signed in to Windows.
- This can be checked on the device by going to Sign In Options (In search box on desktop, type Sign-In Options to get to it) -> PIN section. It will show a confirmationthat the PIN is set up to sign in to Windows.
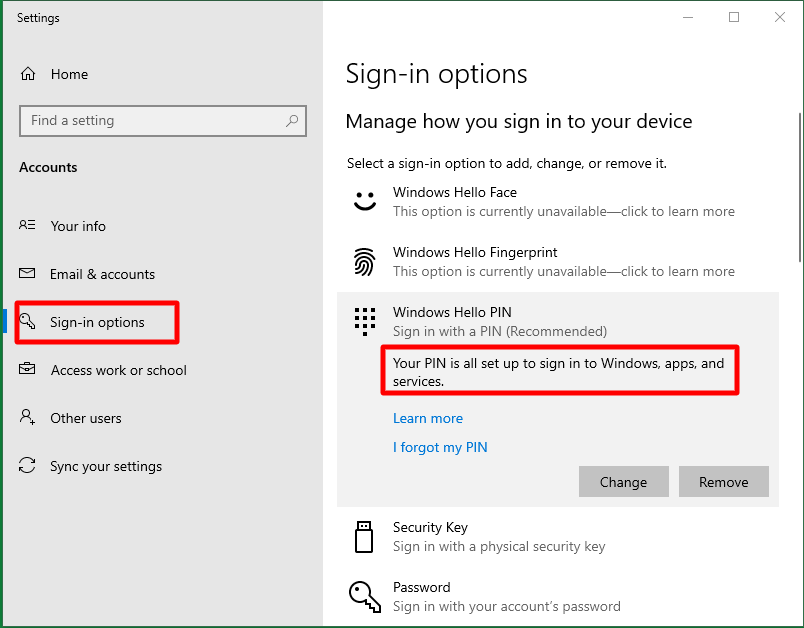 From here user can only change the PIN but cannot remove it. However, if Windows Hello is set to Disabled in Device Profile settings, user will be able to sign in with existing PIN only. He cannot change it.
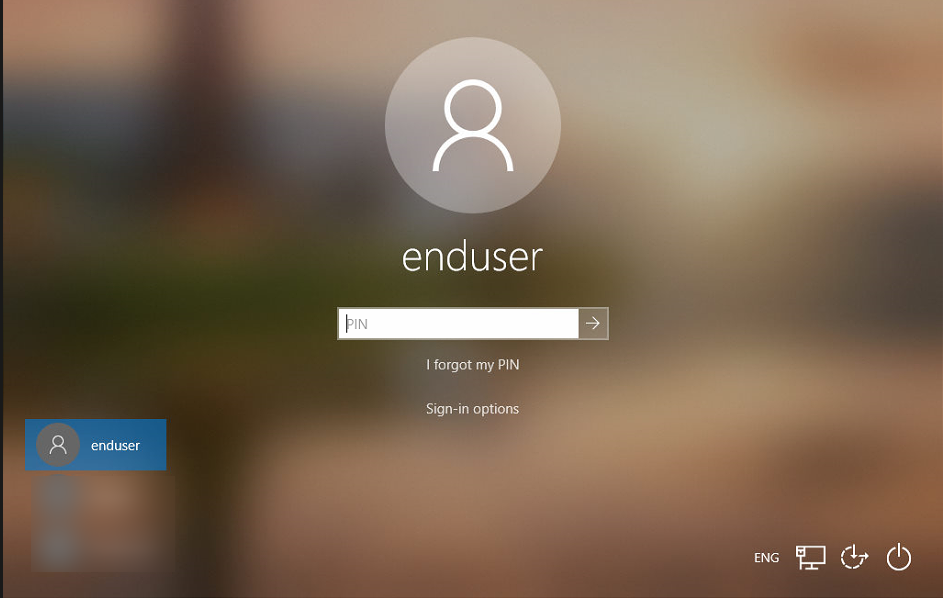
 - Now whenever the user's system starts or is unlocked, on the Sign In page users will see Windows Hello Sign In options. Here, they can enter the PIN set up following above steps which gets them signed in to Windows.
 If you have allowed Biometric authentication (Face Recognition / Fingerprint) and set it up, then that will also show up for the user as part of Sign In options at the time of sign in.


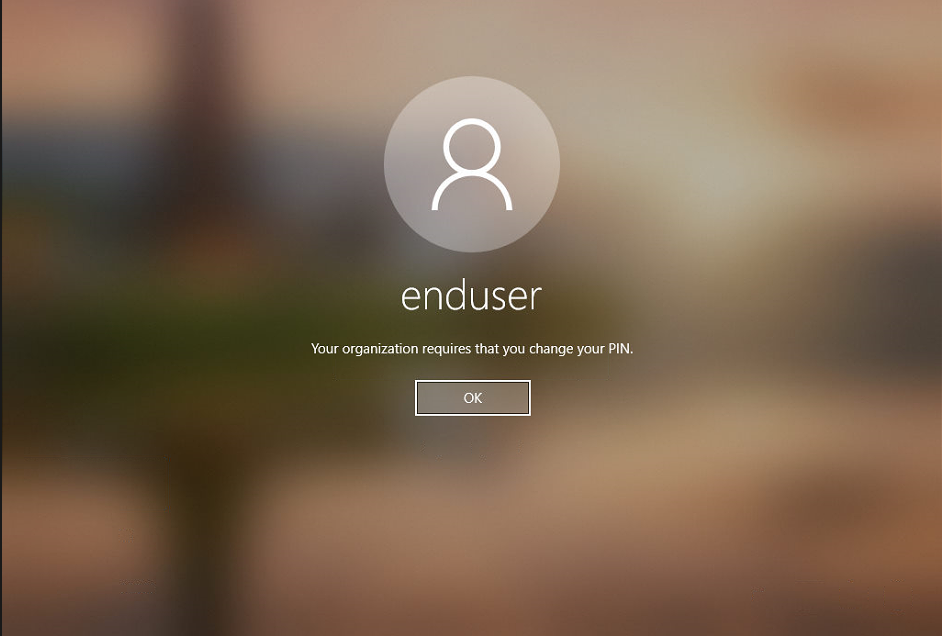
If Admin changes PIN requirements
If Admin changes PIN requirements from Windows Profile > Settings > Windows Hello, then at the time of login user will be asked to reset the PIN which should meet new requirements. In this case,
- At the time of login, following prompt will come.
- Clicking OK will bring up the page to set up new PIN with new PIN requirements displayed
- Setting up new PIN will let him sign in to Windows.


Frequently Asked Questions
Question: On my Windows device, in Sign In options I am unable to see Windows Hello options. It meets minimum Windows version requirement. What is the reason?
Answer: Some windows versions are not compatible and hence hide Windows Hello options from Sign In options automatically. To know more about your device's compatibility, please click here.
Was this article helpful?