Enterprise Data Protection for Windows 10 Devices
- 03 Oct 2023
- 6 Minutes to read
- Print
- PDF
Enterprise Data Protection for Windows 10 Devices
- Updated on 03 Oct 2023
- 6 Minutes to read
- Print
- PDF
Article Summary
Share feedback
Thanks for sharing your feedback!
This feature has been deprecated by Microsoft. Please refer to our help article to understand the actions required by an IT Admin.
Scalefusion helps you protect enterprise data on managed Windows 10 devices by providing Windows Information Protection policies or Enterprise Data Protection policies as they were earlier called.
With the increase in employee-owned devices or co-managed devices, employees use quite a bit of personal applications on their PCs. Windows Information Protection policies helps to protect potential data leakage without interfering with the employee experience.
These policies can be used to specify the applications that are to be run in enterprise context to make sure that the data/files stored by these applications are encrypted and only these apps are allowed to open protected files. You can also specify your network perimeter and specify the URLs and domains that where the data is to be protected and selectively exclude non-enterprise domains.
For more information you can refer to Microsoft's document here but at a high level the features offered are:
- Managed Apps: Lets you identify applications which should be running in an enterprise context and are allowed to access your corporate data. This lets you differentiate between corporate and personal applications.
- Encryption at Rest for Enterprise Data: The data downloaded by managed applications, enterprise websites using any browser is encrypted and stored.
- Prevent Accidental Data leaks: Block, Warn or Log users from copying data from managed apps and enterprise websites to non-managed apps. They can neither copy the data nor open or attach the encrypted files in unmanaged applications. Even when the data is copied to removable media the data stays encrypted and hence prevents accidental leaks.
- Revoke Keys on Compromised Devices: In case the device is lost or stolen, you can choose to delete the device from Scalefusion in which case the data stored so far will become completely unreadable.
Prerequisites
- Login to Scalefusion Dashboard
- A managed Windows 10 Device
Creating a Windows Information Protection Policy
- Login to Scalefusion Dashboard and navigate to Device Profiles & Policies section and either create or edit a Windows profile.
- Navigate to Settings > Security Settings tab to start configuring data protection policies.

- Configure Windows Information Protection: Enable this to start configuring the rest of the Windows Information Policies. Once enabled all the other sections gets enabled. By default, this setting is OFF.
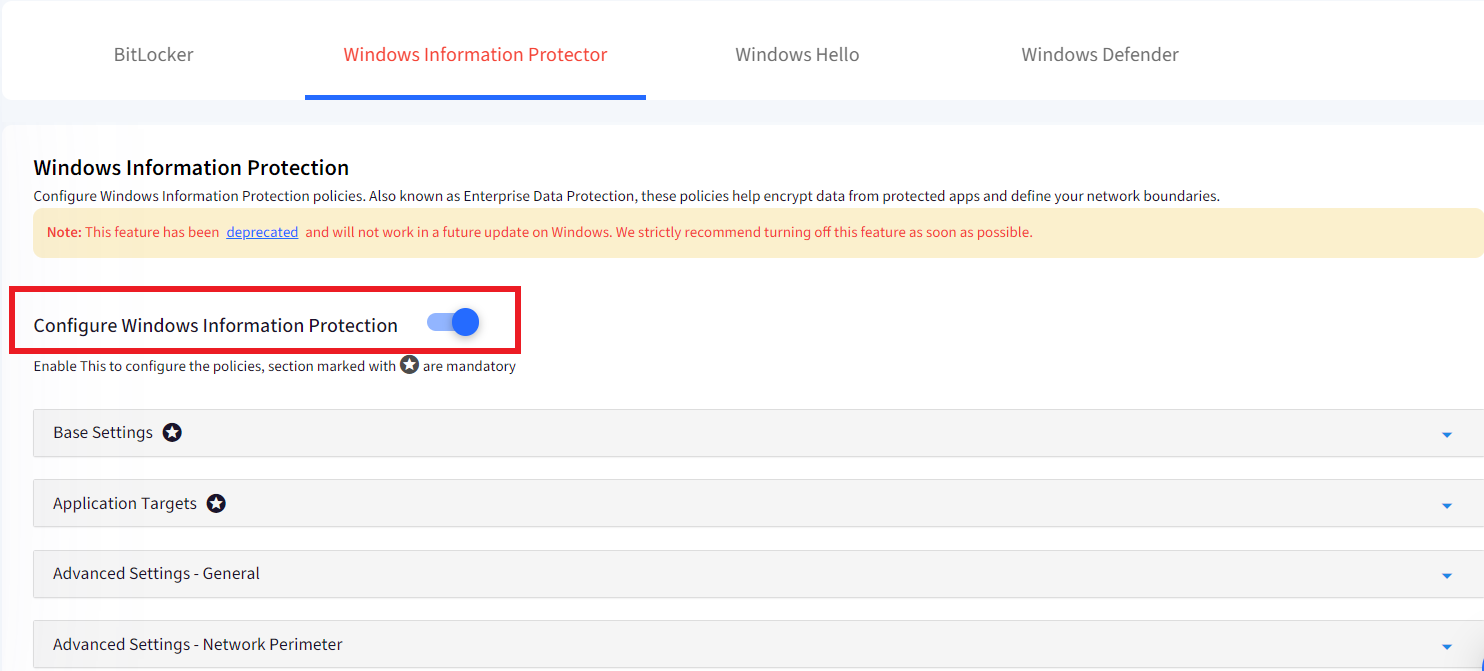
- Base Settings: These are mandatory settings, click on this section to expand it. This section lets you define the basic settings, and the options are:

Settings Description Windows Information Protection Mode Choose how data flows between managed apps and unmanaged apps. The options are: - Off: Users are free to copy data between managed and unmanaged applications.
- Allow & Log Actions: Users are allowed to copy the date but their actions are logged.
- Allow Overrides & Log Actions: Shows user a warning when they are copying the data and allows them to override.
- Block: Does not allow copying of data between managed and unmanaged apps.
Corporate Identity (Primary Domain) Specify your Top-level enterprise identity domain. When the enterprise data is written to disk, WIP uses the Windows-provided Encrypting File System (EFS) to protect it and associate it with your enterprise identity. Show Enterprise Data Protection Icon Enabling this displays a briefcase icon while using managed apps and for encrypted files on disk. Revoke Encryption Keys on Policy Removal If this is enabled, then the files become unreadable when the policy is removed in case the device is deleted or unmanaged from Dashboard. - Application Targets: This is the section that lets you choose the application targets, that is, specify the applications that are protected and the ones that should be exempted.

- Protect Apps: Select the applications that are allowed to access your enterprise data and will honour the policies by auto-encryption or tagging. The data handled by these applications is encrypted, that is, the files downloaded from them are encrypted on disk, they respect the network restrictions set by this policy.
- Exempt Apps: For applications that are not compatible with WIP but still need to access enterprise date, it is recommended to exempt them. This means that your apps won't include auto-encryption or tagging and won't honor your network restrictions. It also means that your exempted apps might leak data.It is important to understand the difference between Enlightened and Unenlightened apps before you choose your Application Targets. Please refer to this document to understand more about general guidance about application policy.You can start by protecting all applications and see if they are able to handle corporate data or not, if they are not able to handle the corporate data then we recommend Exempting them instead of Clear.Clearing a previously Protected app may require you to reinstall the application.
- Advanced Settings - General: Once you have defined your basic settings and application targets, it is time to define the additional settings.

Settings Description Enterprise Proxy Servers list is authoritative (do not auto-detect) Enable this to override Windows auto-detection of proxy servers. Enterprise IP Ranges list is authoritative (do not auto-detect) Enable this to override Windows auto-detection of IP ranges. Encrypted File Extensions Files with the given extensions are encrypted when copying from an SMB share within the network perimeter defined. If left empty, for existing auto-encryption behavior is applied, else only the files with the extensions are encrypted. Use comma “,” to separate multiple values.
Protected Domain Names Specify the list of domains (other than your primary domain, like email domains) used by the enterprise for its user identities. Add multiple values separated by pipe '|' symbol. - Advanced Settings - Network Perimeter: After you've added a protection mode to your apps, you'll need to decide where those apps can access enterprise data on your network. Every WIP policy should ideally include your enterprise network locations. From the Add Network Source menu select the network source to add the domains:

- Enterprise Cloud Resources: Specify cloud resources to be treated as corporate and be protected. If you want the data for a particular URL to be directed through a proxy add that using a comma ',' symbol. Add multiple values separated by a pipe '|' symbol.Make sure to add /*AppCompat*/ to allow internet access in browsers like Google Chrome or Mozilla Firefox.

- Enterprise Protected Domains: Specify the DNS names that form your enterprise network. Combined with the IP ranges these define the network perimeter. Add multiple values separated by pipe '|' symbol.

- Enterprise IP Ranges: Specify your IP ranges that form your enterprise network along with the Enterprise Domain names. With each IP you need to specify the type as-well using comma ',' symbol. Add multiple values separated by pipe '|' symbol.

- Internal Proxy Servers: Specify a proxy through which traffic to cloud resources specified in the Enterprise Cloud Resources settings are to be routed. Add multiple values separated by pipe '|' symbol.

- External Proxy Servers: Add your external proxy servers list here along with the port through which the traffic is allowed and protected. Add multiple values separated by pipe '|' symbol.

- Neutral Sources: Specify the authentication redirection endpoints in your enterprise. These settings considered to be either personal or corporate depending on the context of the connection prior to the redirection. Add multiple values separated by pipe '|' symbol.

- Enterprise Cloud Resources: Specify cloud resources to be treated as corporate and be protected. If you want the data for a particular URL to be directed through a proxy add that using a comma ',' symbol. Add multiple values separated by a pipe '|' symbol.
- Once the Data Protection policy is defined click UPDATE PROFILE to save the profile. The policy will be applied to all the devices where this profile has been applied.


Windows Information Policy on Device
There is no action required by the end user as such to apply these policies. These policies get applied and the applications start protecting corporate data. Here we show some examples:
- Browsing: Since Google Chrome or Mozilla Firefox cannot differentiate between Enterprise and Personal domains, it protects all data if the application is marked as Protected. Whereas Microsoft Edgecan differentiate between enterprise data and personal and lets user choose how to save the data.
- File Saving from Browser: All files downloaded from Chrome stored with as work files.

- Browsing Experience: Notice the briefcase icon on the browser window indicating that the network connection to this domain/website is protected.

- File Saving from Browser: All files downloaded from Chrome stored with as work files.
- File Viewing: Files Downloaded from Protected apps can be viewed on protected apps only, when you try to open them in an unprotected app then they will show an error.

- Copy/Paste: Based on your protection mode the end user may be notified and/or blocked to copy/paste data.


In case you are looking to configure a data protection policy and are not sure on what are the optimal settings please contact us at support@scalefusion.com
Was this article helpful?