Android BYOD Profile for Employee Owned Devices
- 01 Mar 2024
- 11 Minutes to read
- Print
- PDF
Android BYOD Profile for Employee Owned Devices
- Updated on 01 Mar 2024
- 11 Minutes to read
- Print
- PDF
Article Summary
Share feedback
Thanks for sharing your feedback!
Device Profiles are a great way to streamline your enrollment process. Like Device Profiles for Corporate devices, you can create BYOD Profiles for employee-owned Android devices. BYOD Profiles are a great way to unify all your policies under one entity which then can be assigned to a QR Code configuration or a User Group.
At a high level, a BYOD profile offers the following policies,
- Application Policy: Select the applications that are to be installed in the secure work container.
- Browser Shortcuts: Select the browser shortcuts that will be shown in the Scalefusion workplace to provide your employees with quick bookmarks.
- Restrictions: Choose and control the finer security policies that should be applied on an employee-owned device.This document covers the BYOD policy that is used for Personal/Employee-owned devices. If you are looking to manage corporate-owned devices, please refer to our guide on Device Profile for Corporate Devices.
Before You Begin
- You must have a valid Scalefusion account.
- Completed the Android for Work setup for managing devices with Scalefusion Device Manager.
- Completed Android Enterprise Setup with Android Device Manager for managing devices with AMAPI.
Creating a BYOD Profile
- Sign In to Scalefusion Dashboard and navigate to Device Profiles & Policies ➞ Device Profiles.
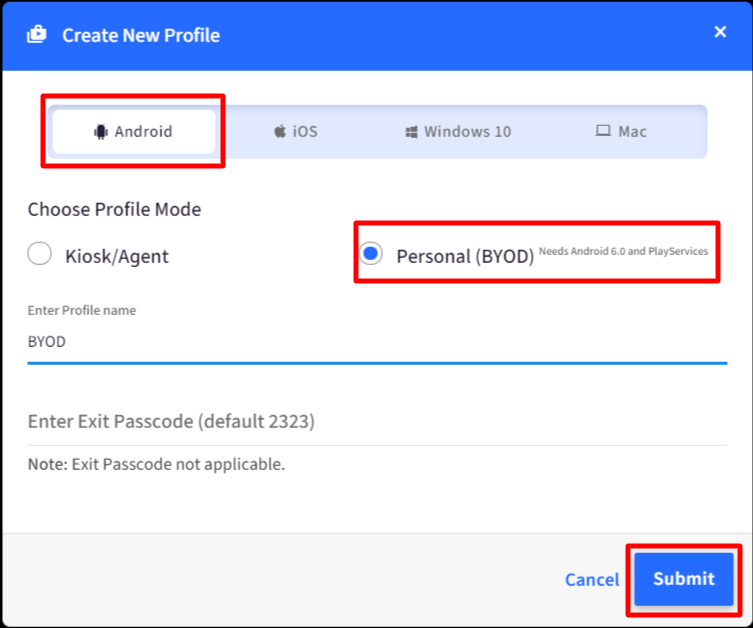
- Click on Create New Profile in the upper right corner.
- From the Android tab, select the Personal (BYOD) option. Enter a name for your new Profile and click SUBMIT to see the profile creator window.
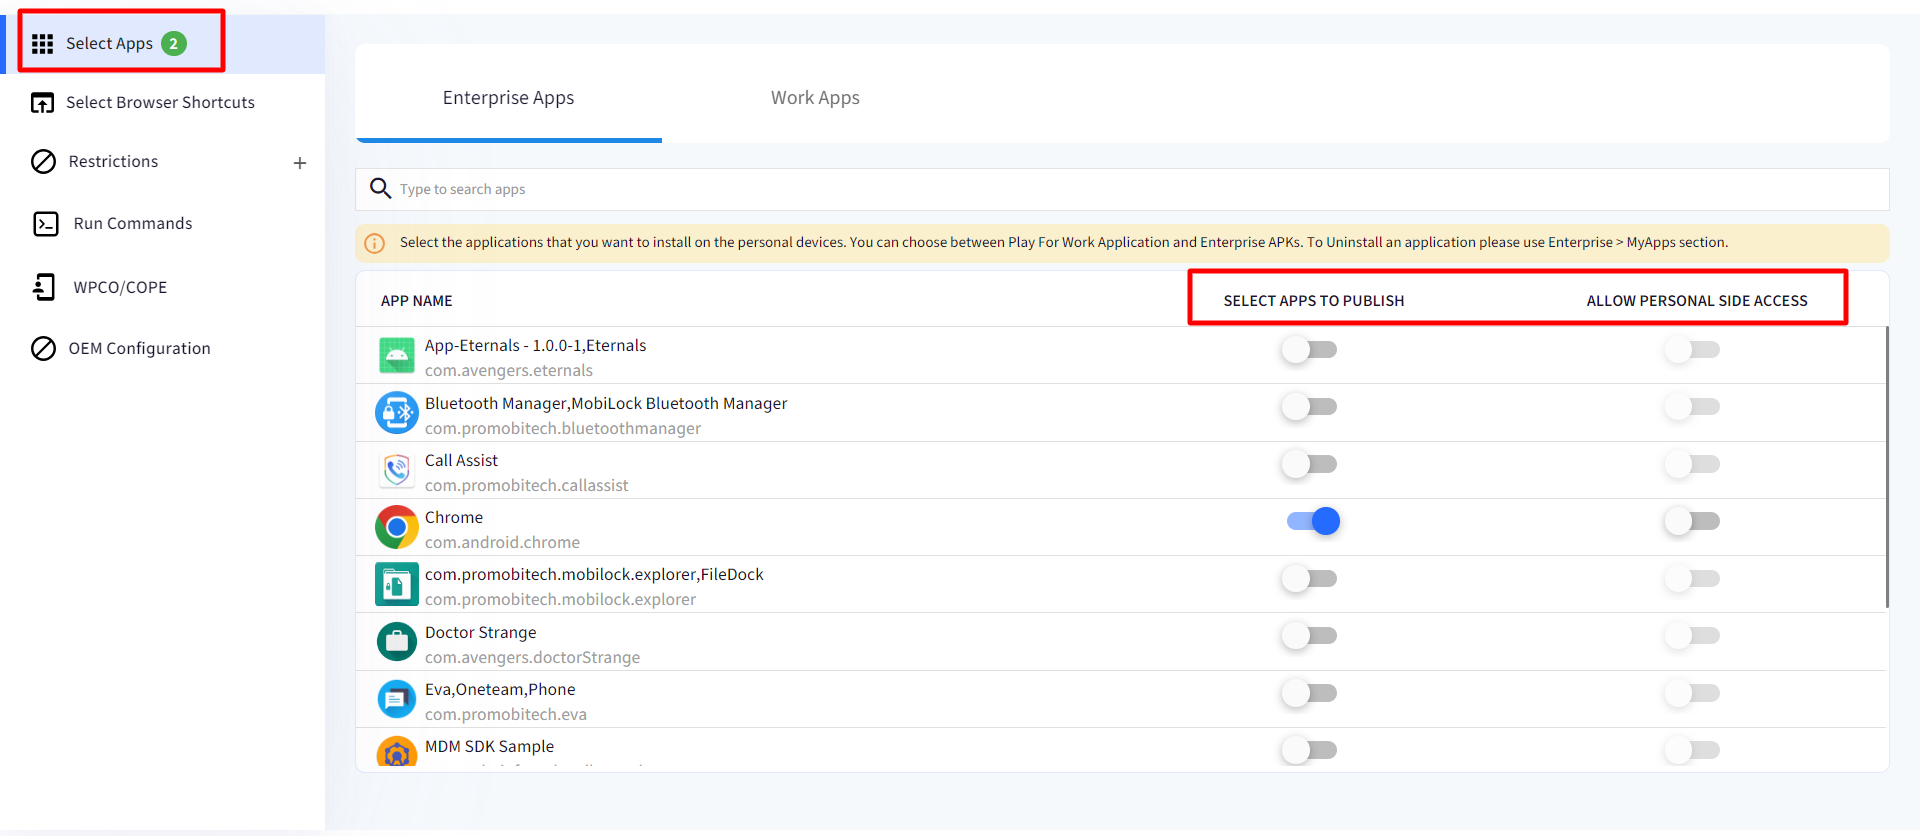
- The first section in the profile creator window helps you decide on the application policy. Enable all the applications that you would like to be installed and used in Work Apps, as shown below, and click NEXT once done.
- Allow Personal Side Access: There are cases where an app may exist on personal side and you may want the same to access on work side and share data between both. Enabling this setting, allows you to access the data of personal apps from work side. The data of the app will be synced with the same application on the work side. As for example, you may want to access Calendar app both from personal and work container. So on enabling this setting, you will be able to see the calendar details of personal side when you access Calendar app from Work container.
Note: This toggle will be enabled only when you select the app to publish.
 NoteThe first time you are here, you will only see the recommended Scalefusion applications. We suggest you use the Application Management guide to search and add the applications that you want to allow in your organization so as to add more Work apps.
- Allow Personal Side Access: There are cases where an app may exist on personal side and you may want the same to access on work side and share data between both. Enabling this setting, allows you to access the data of personal apps from work side. The data of the app will be synced with the same application on the work side. As for example, you may want to access Calendar app both from personal and work container. So on enabling this setting, you will be able to see the calendar details of personal side when you access Calendar app from Work container.
- The next section is the BROWSER SHORTCUTS section, where you can select the previously allowed websites. The visible shortcuts will appear in Scalefusion Workplace as bookmarks so that your users can easily navigate to them. Click NEXT once you are done.
 NoteUse Device Profiles & Policies > Allowed Websites section to create and allow websites.
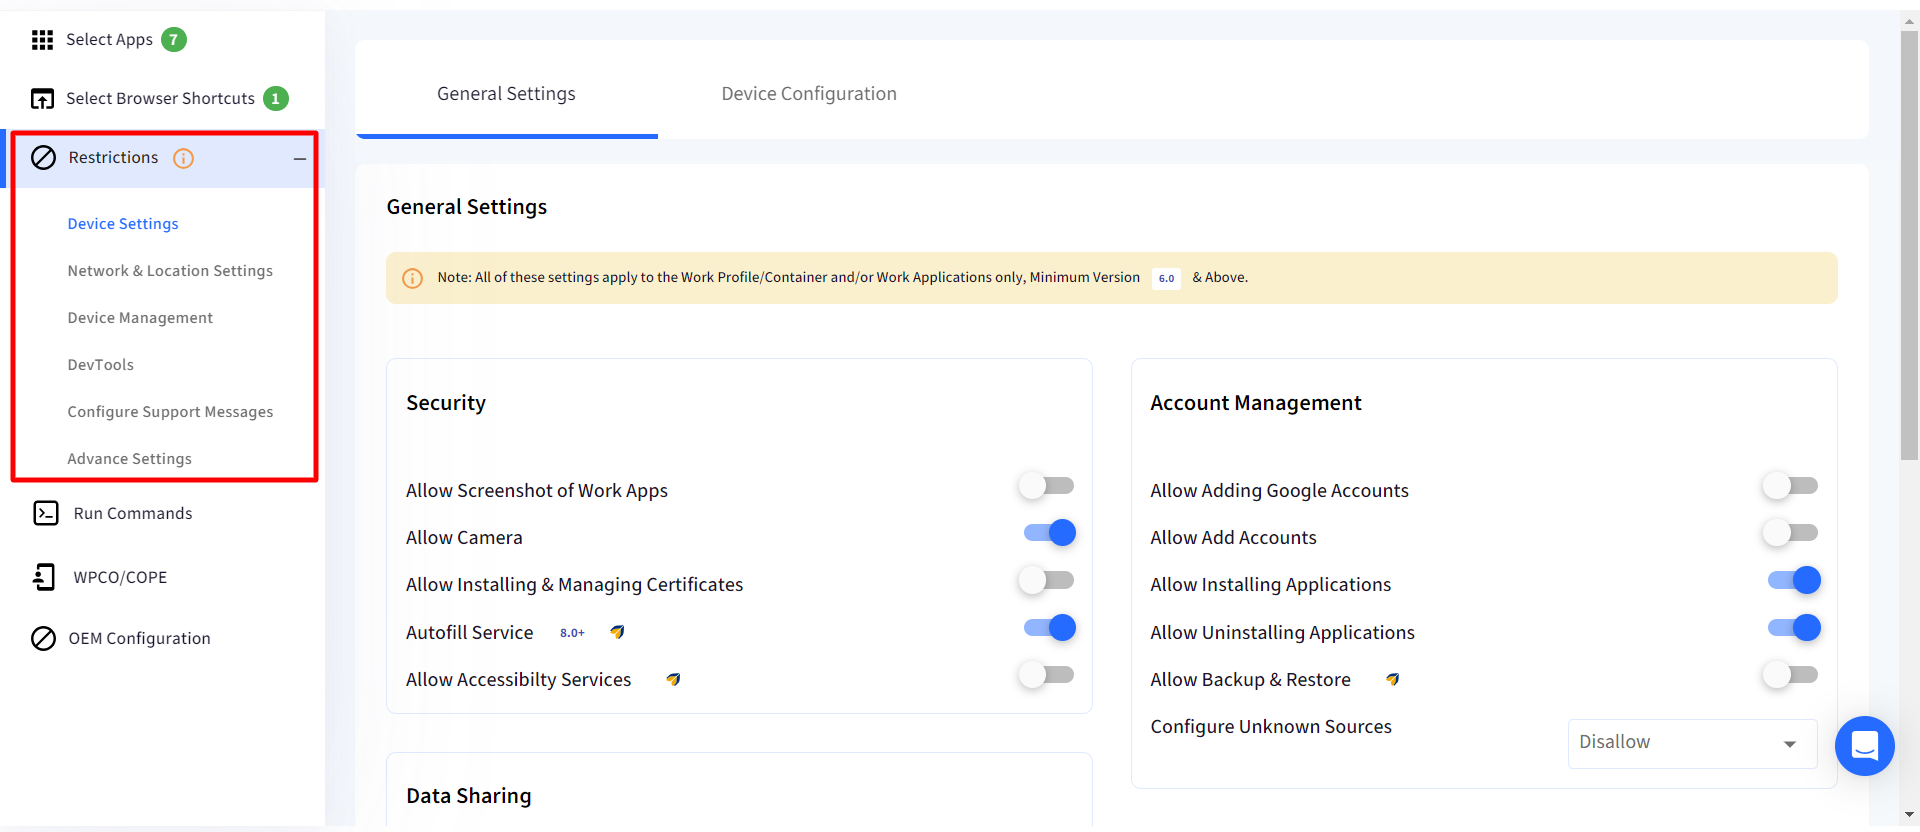
 - The last section is the RESTRICTIONS section which gives you a wide range of policy controls. Configure the policies as per your requirements. The section is divided into sub-sections allowing you to define various policies,


Device Settings
General Settings
| Setting | Category | Description |
| Allow Screenshot of Works App | Security | Control if the user is allowed to take screenshots or share screens of the Work Apps. |
| Allow Camera | Security | Allows work apps to access the device camera. |
| Allow keyguard Fingerprint Sensor | Security | Choose if users can configure a fingerprint-based unlock on the lock screen. |
| Allow Keyguard Trust Agent State | Security | Choose if users can pair their Bluetooth devices as trust agents to auto-unlock the device. |
| Allow Keyguard Undredacted Notifications | Security | Choose if unredacted notifications are allowed on the Lock screen. This can prevent possible loss of critical information via Lock screen notifications. |
| Allow Installing & Managing Certificates | Security | If enabled, users can install and manage certificates manually on the device. |
| Allow Adding Google Accounts | Account Management | Allow users to add Google accounts on the Work Profile side. |
| Allow Add Accounts | Account Management | Allow users to add non-Google accounts on the Work Profile side. |
| Allow Unknown Sources | Account Management | Allow users or other applications to install applications from Unknown sources on the Work side. |
| Allow Installing Applications | Account Management | Allow users to install applications from the Play Store on the Work side. |
| Allow Uninstalling Applications | Account Management | Allow users to uninstall applications on the Work side. |
| Allow clipboard between Managed/Unmanaged Apps | Data Sharing | Choose if the users are allowed to copy/paste data between their Work Apps and Personal apps. |
| Allows Work Apps to Access Documents from Personal Apps | Data Sharing | Choose if Work Apps can access documents from the personal app side. This lets's user |
| Allow Personal Apps to Access Documents from Work Apps | Data Sharing | Choose if Personal applications can access documents of the work applications. |
| Allow Personal Apps to Share Documents with Work Apps | Data Sharing | Choose if the user can share personal documents using the work applications |
| Allow Work Apps to Share Documents with Personal Apps | Data Sharing | Choose if the user can share work app documents with the personal applications. |
| Allow Work Contact's caller ID info to Show in Dialer | Data Sharing | Choose if a work contact can appear in the personal dialer application. |
| Allow App Widgets to be added to Home Screen | Data Sharing | Choose if the user can add home screen widgets for work applications. |
| Share Enterprise contacts with Bluetooth Devices | Data Sharing | Choose if the user can share their work contacts via Bluetooth devices. |
| Allow Work Contacts in Personal Contacts App | Data Sharing | Choose if the work contacts appear in the personal contacts app. |
| Allow GMail | Application Management | Choose if the GMail application should be allowed on the work side. |
| Allow YouTube | Application Management | Choose if YouTube application should be allowed on the work side. |
| Allow Chrome | Application Management | Choose if Chrome should be allowed on the work side. |
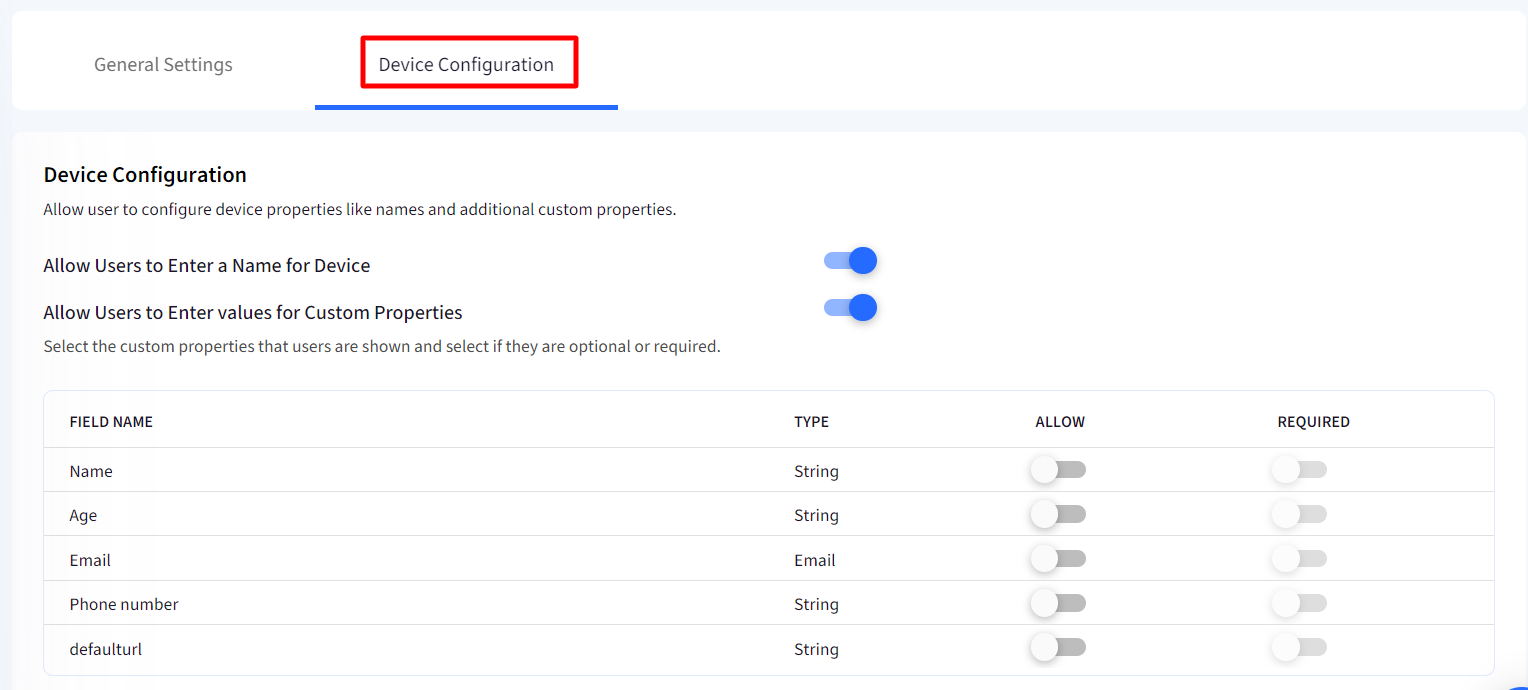
Device Configuration
The following are the additional settings that can be configured under this:
- Allow Users to Enter a Name for Device: If this is selected, then users are allowed to set the device name from the device when they enroll it.
- Allow Users to Enter Values for Custom Properties: When this flag is selected, users can set values for the custom fields (from the device at the time of enrollment) that are defined through Custom Properties. For each custom field following can also be configured from here:
- Allow: Shows or hides the custom field to the user
- Required: Select if the field is optional or required.Device Configurations can be enabled from QR code configurations also. If they are configured from QR Code configurations, those will take precedence.

Network & Location Settings
- WiFi Settings: This option allows you to choose a WiFi configuration for your BYOD profile. This would create the connection on your BYOD devices but will not enforce it.NoteCreate Wifi configurations under Device Profiles & Policies > All Configurations > Wifi Settings section on the Scalefusion Dashboard.
- VPN Settings: From the list of applications, you can select one app and mark it as Always On VPN with an additional flag to lock down the network.
This feature works only on EMM devices having OS7 and above versions, being set up using afw#mobilock or being set up as Device Owner.Setting Description Select an Always On VPN Application Simply select an application from the list that will be configured as an Always On VPN app Enable VPN Lockdown Once this is enabled, any failure of the VPN provider could break networking for all apps - Location Settings: Configure Location Settings on the device profile, which gets applied to the devices on which the profile is applied. To configure Location settings, toggle on the first setting, that is, Override Global Location Settings. This enables the other settings and makes them configurable. When applied, they override the settings that have been set through Location & Geofencing > Location Settings on the Dashboard.
To learn more about Location Settings, visit the section Configure Location Settings
Device Management
- Application Management Settings: From this section admin can configure application management settings for EMM-managed devices that let them control the catalog features.
Setting Description Google Play for Work App Settings
Force Application Install on Publish
If this flag is enabled, it silently attempts an install of the app (when published) on the device else just adds it to the managed Play Store. Configure Application Visibility in Managed Google Play Store The app's visibility on the Managed Google Play Store can be controlled with this setting. The following are the options to choose from:
- All Approved: All Play for Work apps are shown on the device when the PlayStore app is enabled
- Published: Only Published apps will be shown on the device and not all others. Hence, only the applications that have been explicitly published to this profile will be visible on the device.
- Full Access to Play Store: In Agent mode, this setting allows users to access the Full Google Play Store and install any application without adding their personal account. Please note they cannot add/purchase paid applications.
- Work Profile Password: This section allows you to enforce a separate password for your Work Apps. This is quite useful if you don't want to enforce a Device Level Password for your employees. This ensures that access to Work Apps is protected by a password. Once the Require Passcode is enabled, you can configure the Password Type and Password Management policy. The options available are,
- Select Password Complexity: Select the password complexity between Low, Medium, High. The password complexity is applicable on Android OS 12 or above.
- Select Passcode type: Choose between numeric or alpha-numeric passcode.
- Minimum Passcode length: Provide a minimum length of the password. Note that although 4 is an allowed option, on some devices, the minimum accepted value is 6, and in these cases, it will default to 6.
Important Note:
Password Type and Minimum password length can be applied on devices below Android OS 12. However, they are populated based on the complexity type you select.
Legacy SettingsLegacy Settings are applicable on devices below Android OS 12 - Enforce Complex Passcode: Enable this option if you want to enforce a complex passcode. Simply enabling this enforces the user not to have an ascending or a descending order of numbers or characters like, for ex: 1111 OR abcd1.
If the password type is selected as Alphanumeric and a complex password is enforced, then additional complexity parameters can be specified as given below,Setting Description Minimum number of symbols Enforces a minimum number of symbols in the password. Minimum number of lower-case characters Enforces a minimum number of lowercase characters in the password. Minimum number of alphabets Enforces a minimum number of alphabets in the password. Minimum number of upper-case characters Enforces a minimum number of upper-case characters in the password. Minimum number of digits Enforces a minimum number of digits in the password. - Password Expiry Period: Select how often the user is forced to change the password.
- Maximum Password History List: Select the number of historical passwords that the user cannot use while setting a new password.
- Maximum Failed Attempts to Factory Reset: Select after how many failed attempts the work profile should be removed.
This WILL NOT factory reset the device. It removes the work apps and all work data. - Set Idle Time for Auto lock: Choose an idle time after which the device should auto-lock.
- Select Password Complexity: Select the password complexity between Low, Medium, High. The password complexity is applicable on Android OS 12 or above.
- Device Level Password: You can set the passcode policy inside the device profiles. This provides the flexibility for the IT admins to define passcode policies of different complexities to devices in different profiles. To configure, Toggle on the button Override Global Password Policy, only then the passcode settings become configurable. Please visit here to learn about various passcode settings and how to configure them.
The policy created here will override the global passcode settings and will be applied to the devices of this Android profile. - Compliance: Choose the Compliance levels and the actions to be taken for compromised devices. Refer to our Google Play Protect API guide for complete reference.
- Exchange Settings: Use this setting to configure an Exchange account on the device. You can select a previously created exchange configuration. Please refer to our Exchange configurationdocument for details.The GMail client is configured with the given configuration. Currently, the GMail app does not allow the exchange configuration to be unpublished. So if you want to un-publish at a later point, you would have to publish a dummy/invalid account to the devices.
Dev Tools
Developer API
In the Developer API section of the Device profile, an MDM SDK is provided that can be used in your enterprise apps to get the device information and perform a wide variety of actions (like launching the wifi screen, toggling mobile data, toggling hotspot etc.) locally on the device. Visit here for more details.
Configure Support Messages
IT admins can configure support messages that appear on the settings screen when the user tries to access any functionality/feature that is blocked or restricted. Both long and/or short messages can be configured. To configure,
- Toggle on the setting Configure Support Messages

- In the text area, enter the message.
- Long and Short Support Message: These appear on the settings screen when a user tries to access any functionality/feature that is blocked or restricted. The maximum length of the message is 4096 characters. However, for a short message, if the message length is greater than 200 characters, the message is truncated on the device.
- Work Profile wipe message: The message entered here is displayed to the user when the work profile is deleted from the device by the admin.
- IT admins can enter the message in their preferred language.

Advanced Settings
App Delegation
IT administrators now have the capability to assign additional privileges, such as Certificate Management, app permission management, and the ability to prevent uninstalls, to their third-party application(s). To know more, click here.
Once you have configured the various sections, click on CREATE PROFILE to create the profile. Once the profile is created, it starts appearing in the Device Profile listing view with a User badge next to it, indicating that this is a BYOD profile.
Any future updates to the device profile are automatically pushed to the devices. Hence please make sure to validate the changes before editing.
Once you have created a Device Profile to apply it to devices, you can do the following,
- Create a QR Code Enrollment Configuration: This will make sure that any user using the QR Code for enrollment will get these policies by default.
- Assign to a User Group: This will apply this profile to all the Android devices of the users in that group.
Was this article helpful?